Cole Systems Inc.

How to Report Phishing

Identify a Suspicious Email

When in Outlook look for these common signs of phishing or malicious emails:
1.
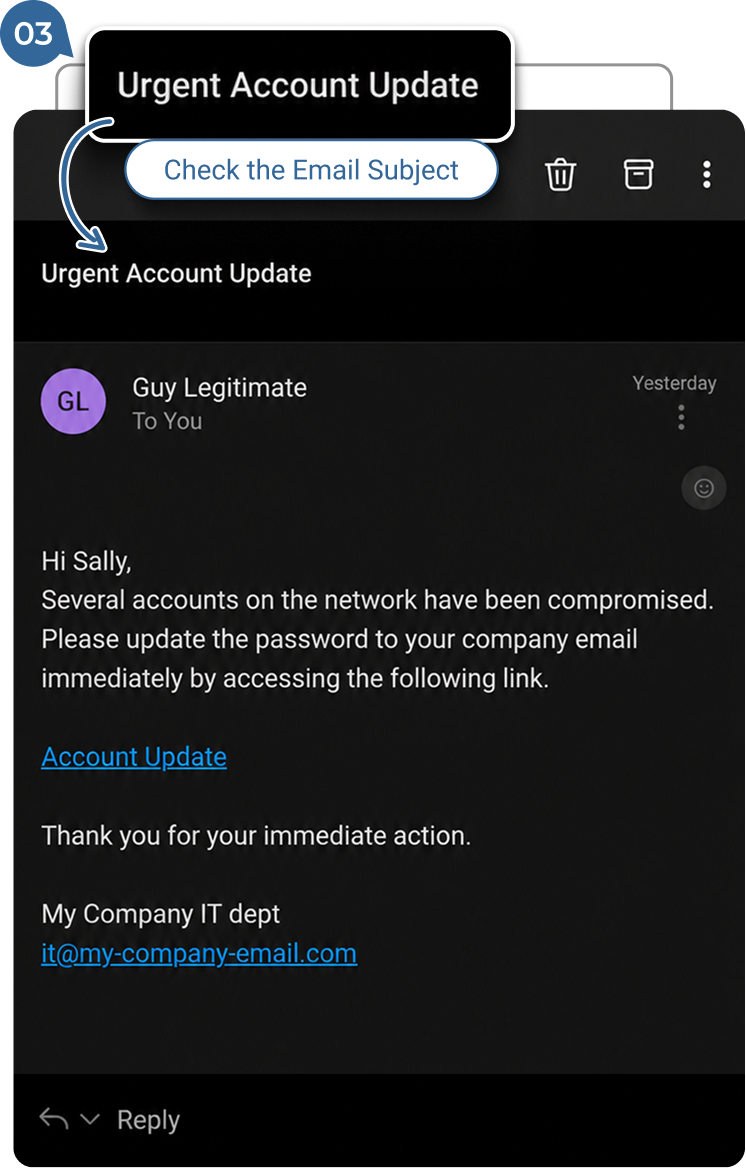
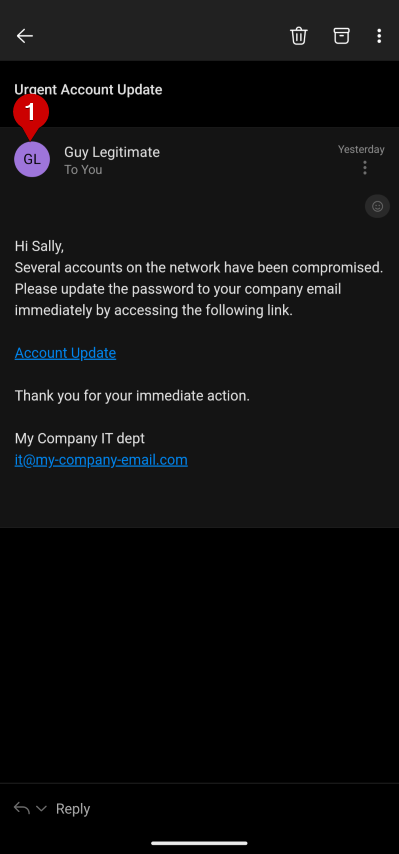
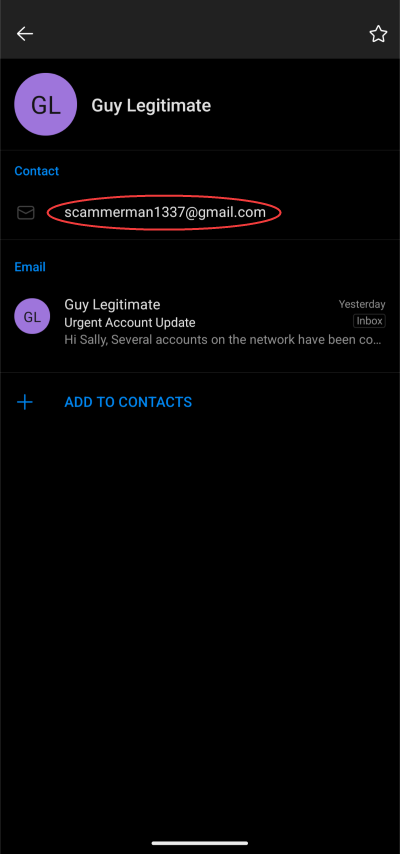
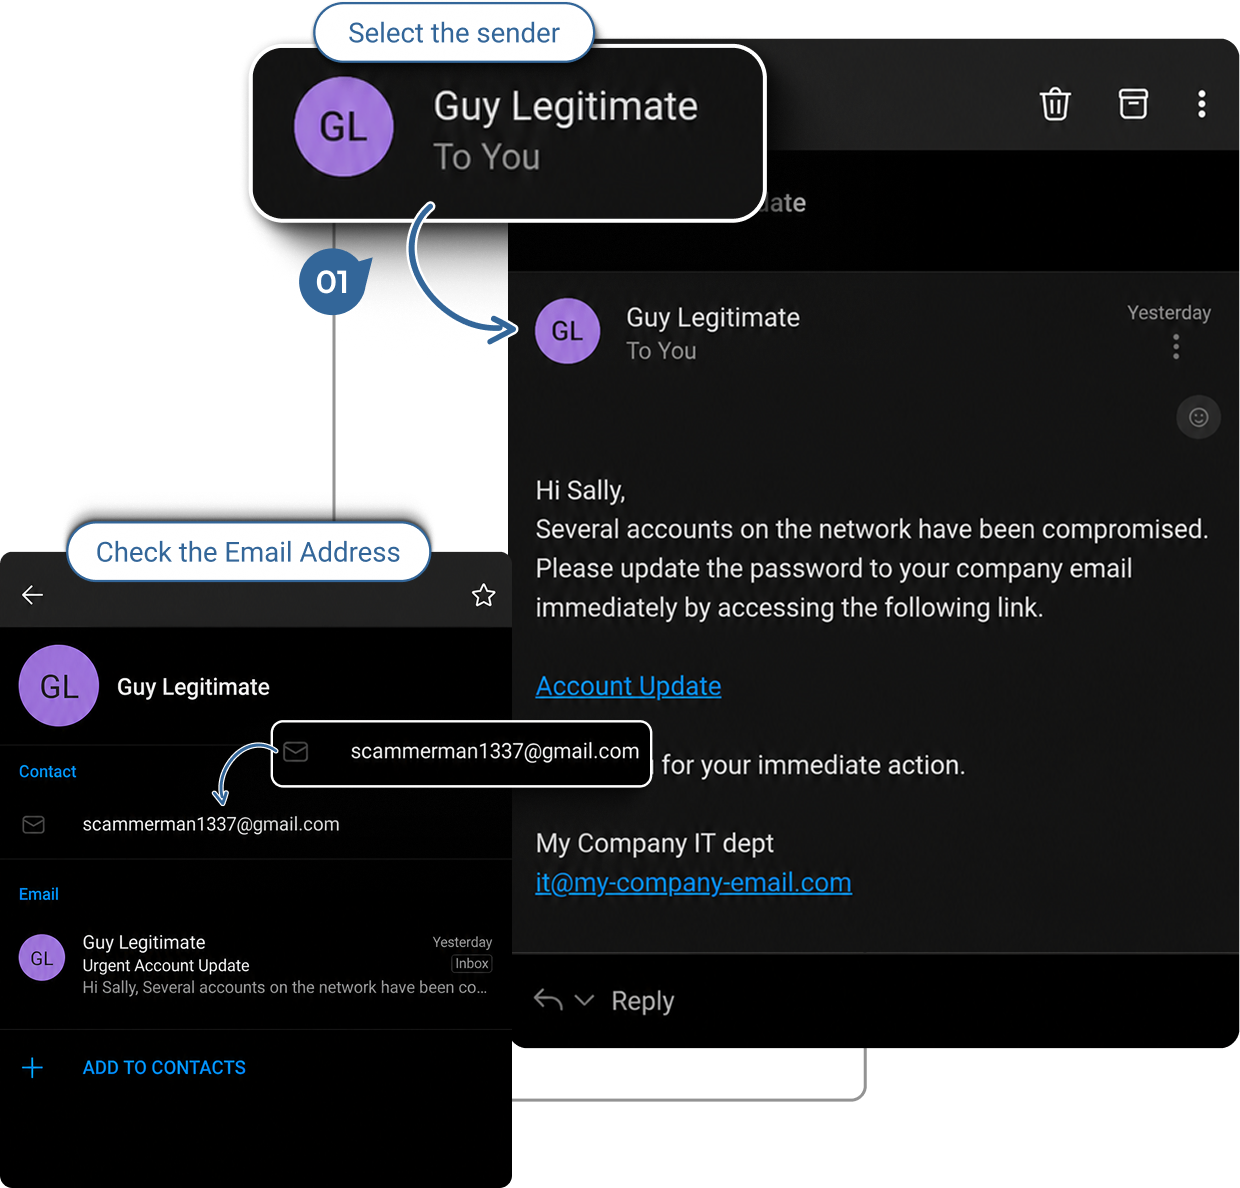
Display Name Doesn’t Match Email Address: The name shown might look familiar, but the email address is different. Tap the sender’s name to see the actual email address.
2.
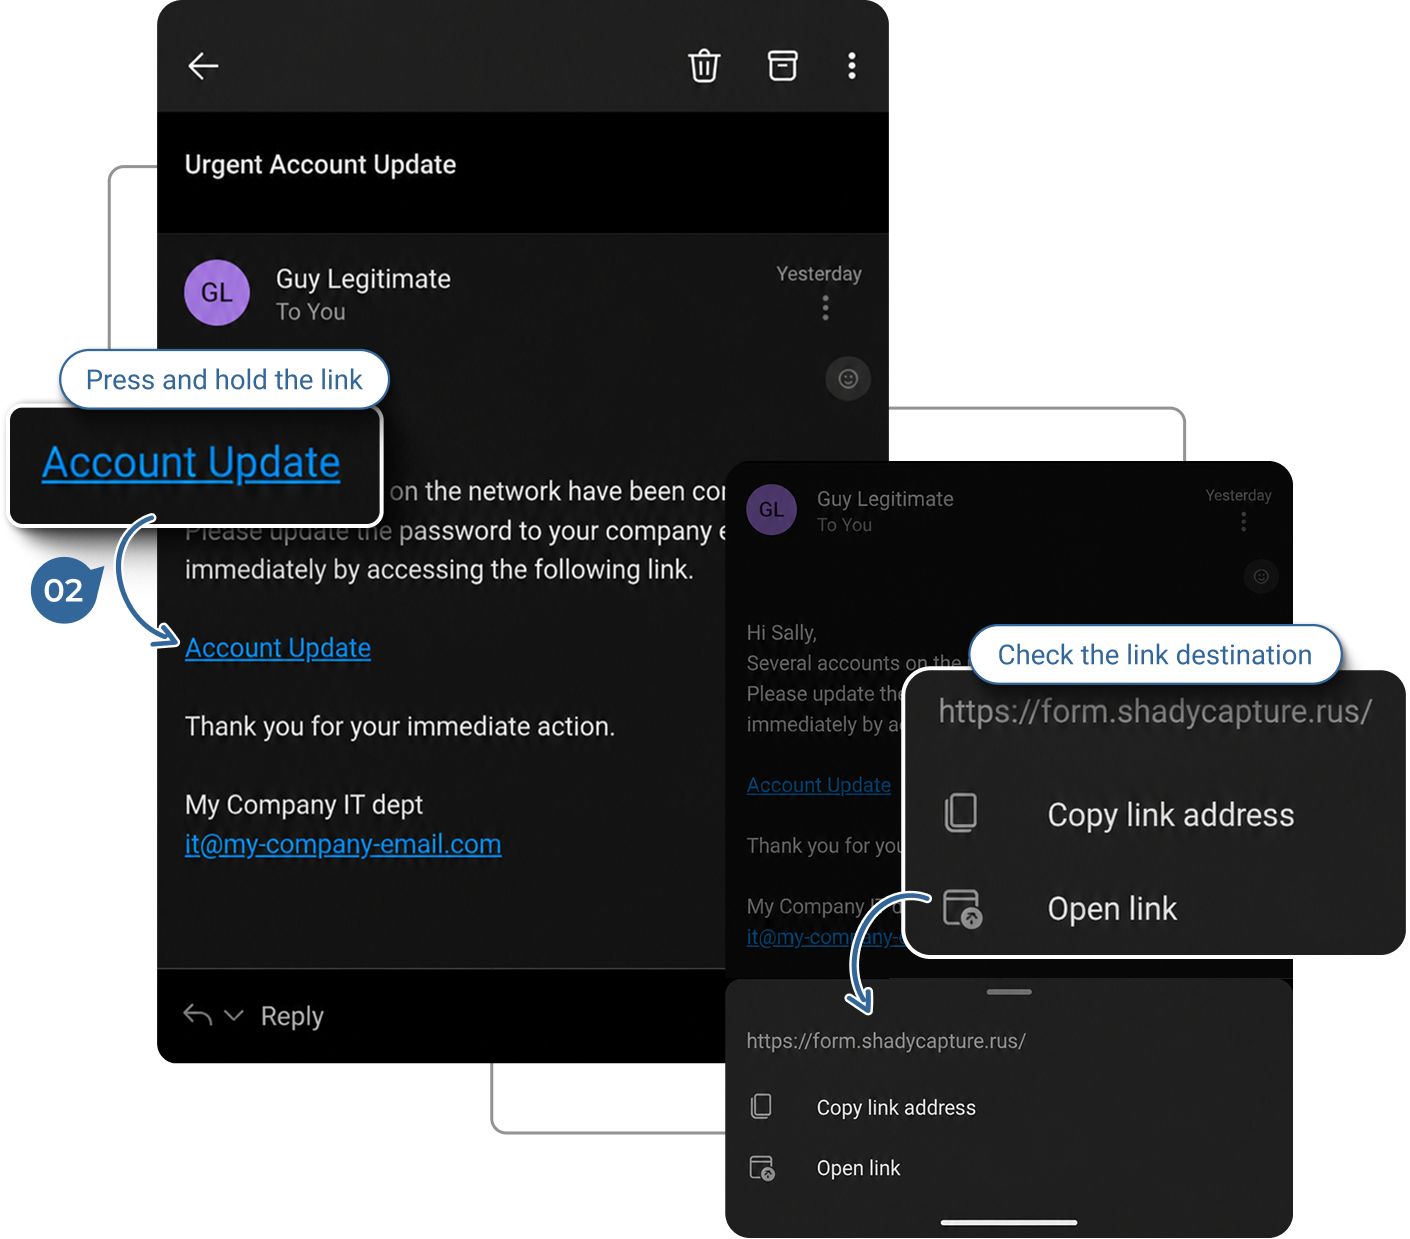
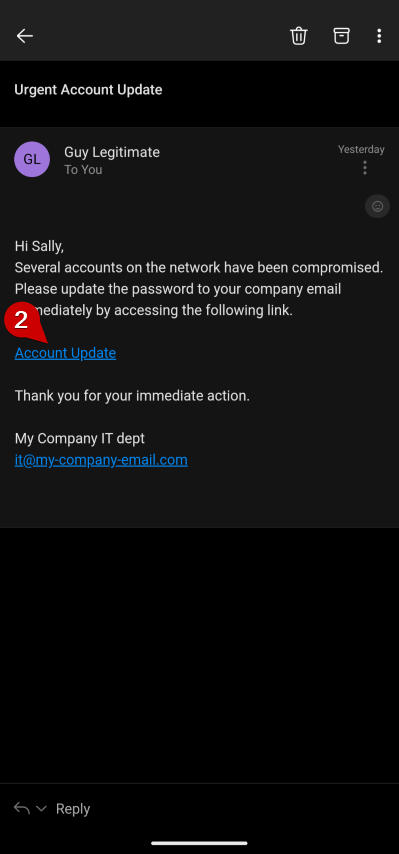
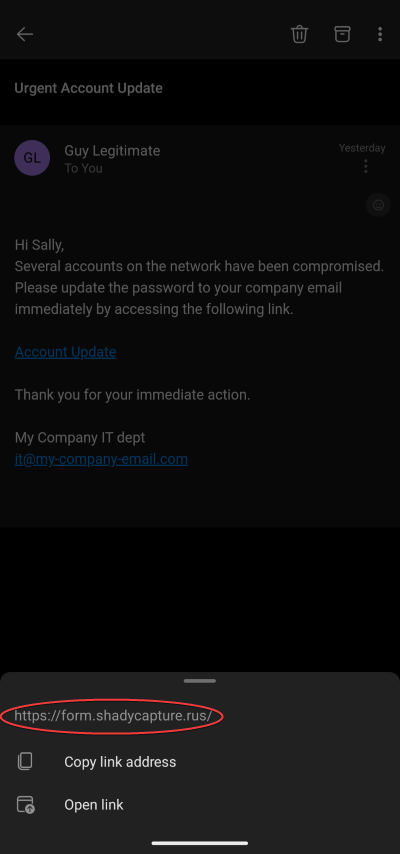
Hyperlink Text Doesn’t Match the URL: Phishing emails often use deceptive link text. Hold your finger on the hyperlinks to see the actual URL; if it looks suspicious or doesn’t match the expected website, it’s a red flag.
3.
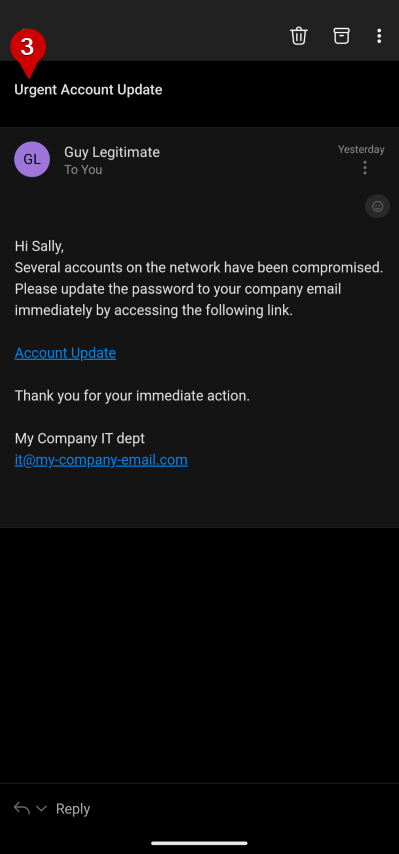
Urgent or Threatening Language: Phishing emails often create a sense of urgency or fear to prompt quick action, such as “Your account will be locked” or “Immediate action required.”

Suspicious Attachments: Unexpected attachments, especially those with extensions like .zip, .exe, or .docm, can be dangerous. Avoid opening attachments you weren’t expecting.

Spelling and Grammar Errors: Phishing emails often contain spelling mistakes or awkward phrasing that wouldn’t be present in legitimate communication.

Requests for Sensitive Information: Legitimate companies will not ask for personal information like passwords, social security numbers, or credit card details via email.

Generic Greetings: Phishing emails often use generic greetings like “Dear Customer” instead of your actual name.

Strange Email Domain: Be cautious if the domain doesn’t match the supposed sender. For example, an email claiming to be from Microsoft but sent from a random domain like “@secure-microsupport.com” is suspicious.

Anatomy of a URL (Web Address)

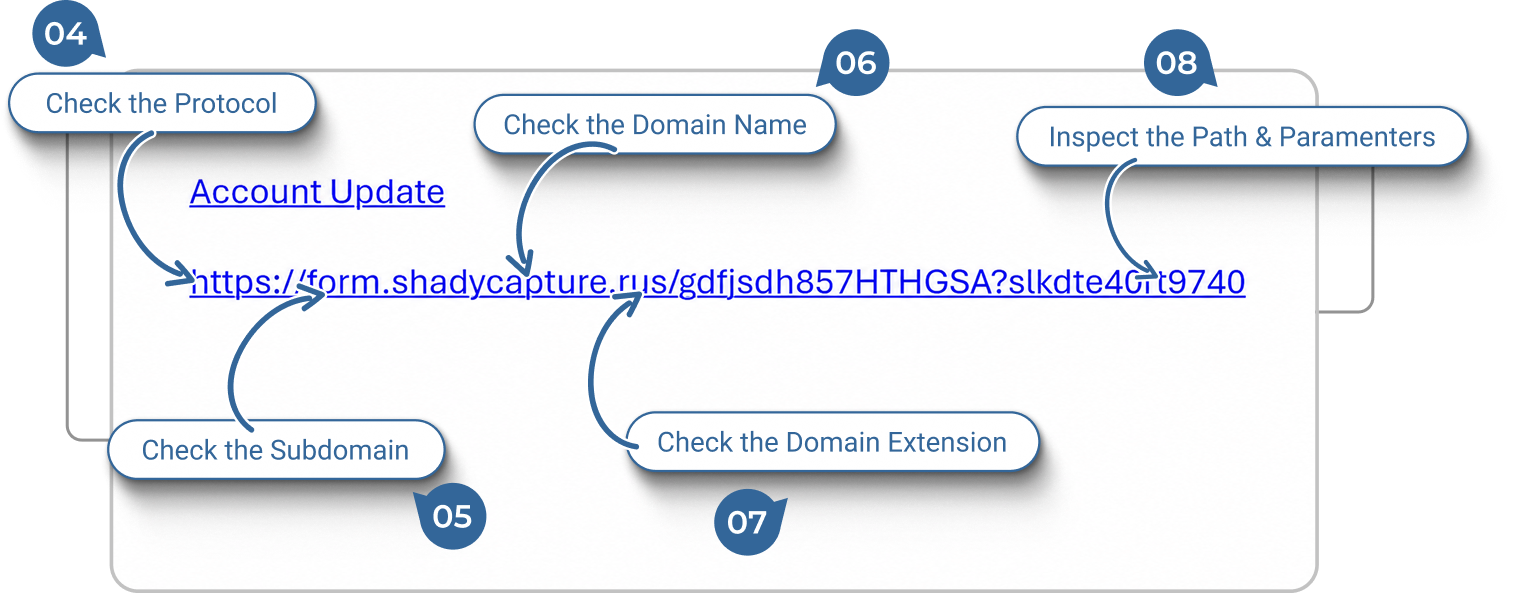
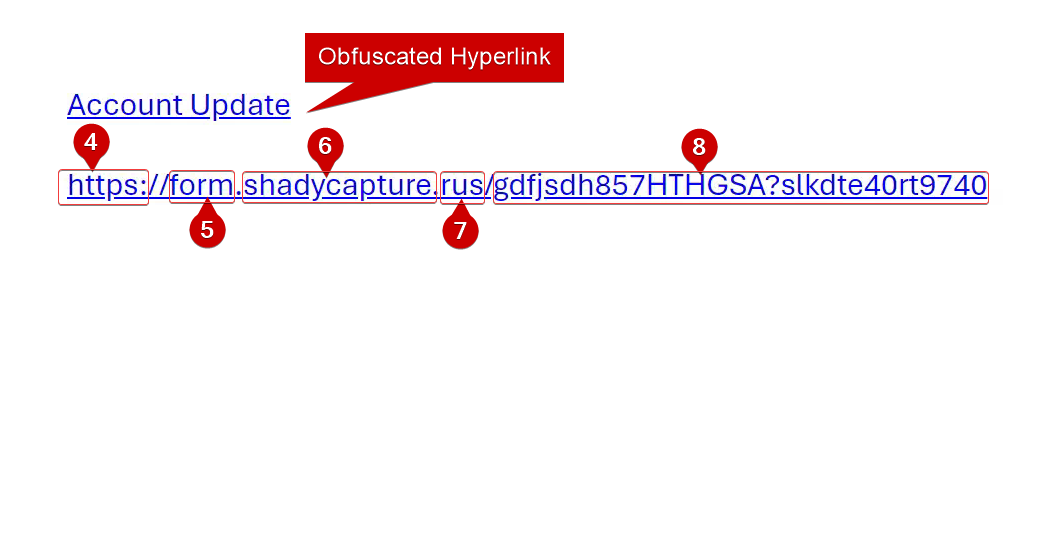
Anatomy of a URL: To better understand what to look for in a suspicious email domain, it’s helpful to understand the anatomy of a URL:

4.
Protocol: This is usually “http” or “https”. Secure websites use “https” with the “s” indicating a secure connection.
5.
Subdomain: This part comes before the main domain, like “mail” in “mail.example.com”. Be wary of strange subdomains, as attackers often add misleading subdomains to appear legitimate.
6.
Domain Name: This is the main part of the URL, such as “example” in “example.com”. Make sure this matches the expected sender.
7.
Top-Level Domain (TLD): This is the extension like “.com” , “.org” , or “.net” . Phishing emails may use unusual TLDs or variations of a familiar one.
8.
Path: The path comes after the domain and specifies a particular page or location on the website. Be cautious if the path looks strange or includes excessive random characters.

Report a Suspicious Email as Phishing

Open the “Report Phishing” Tool
9.
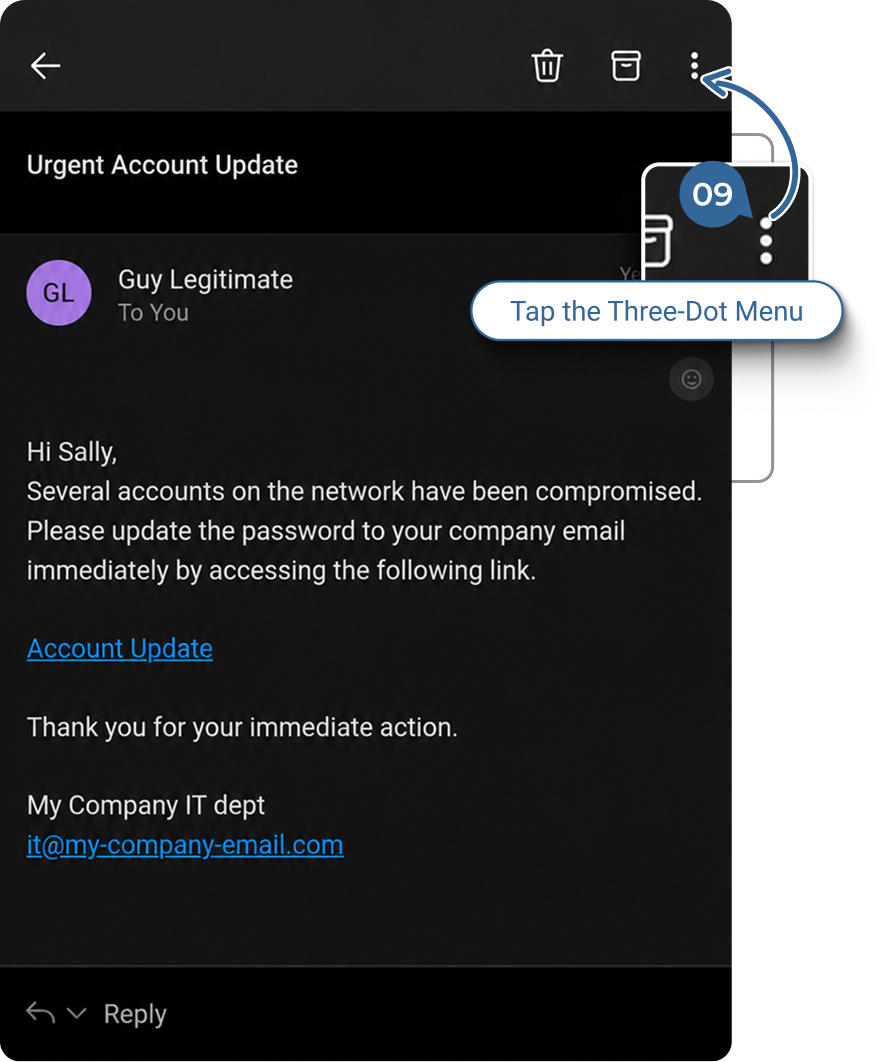
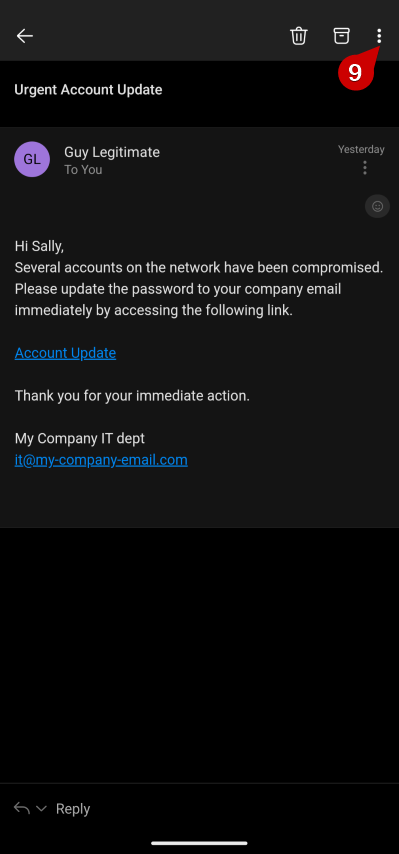
Tap on the three dots in the upper most right hand corner: This will open the More Items menu where you can select “Report junk”.
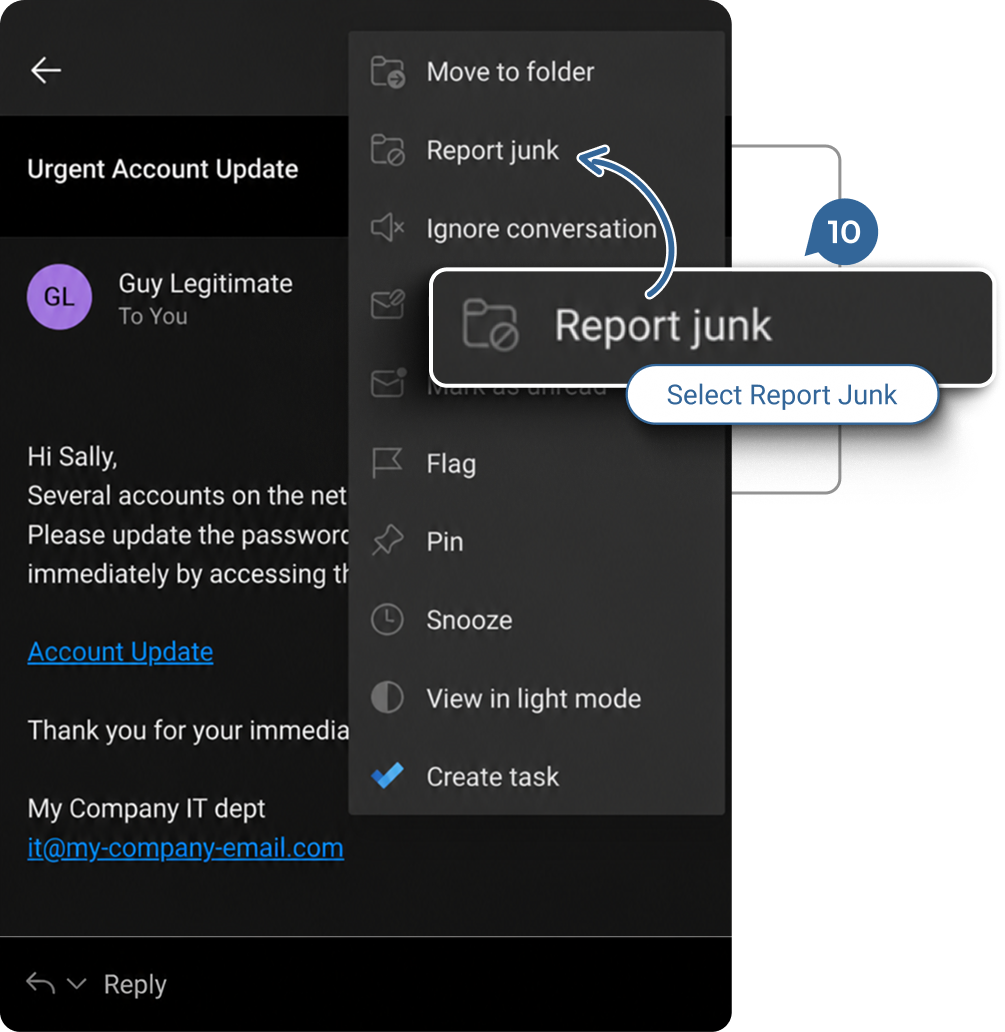
10.
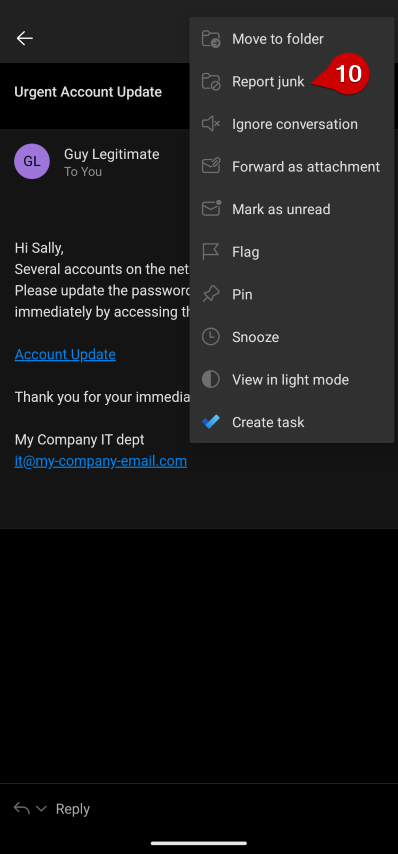
Select “Report junk”: In the menu that pops up, click on “Report Junk”.
11.
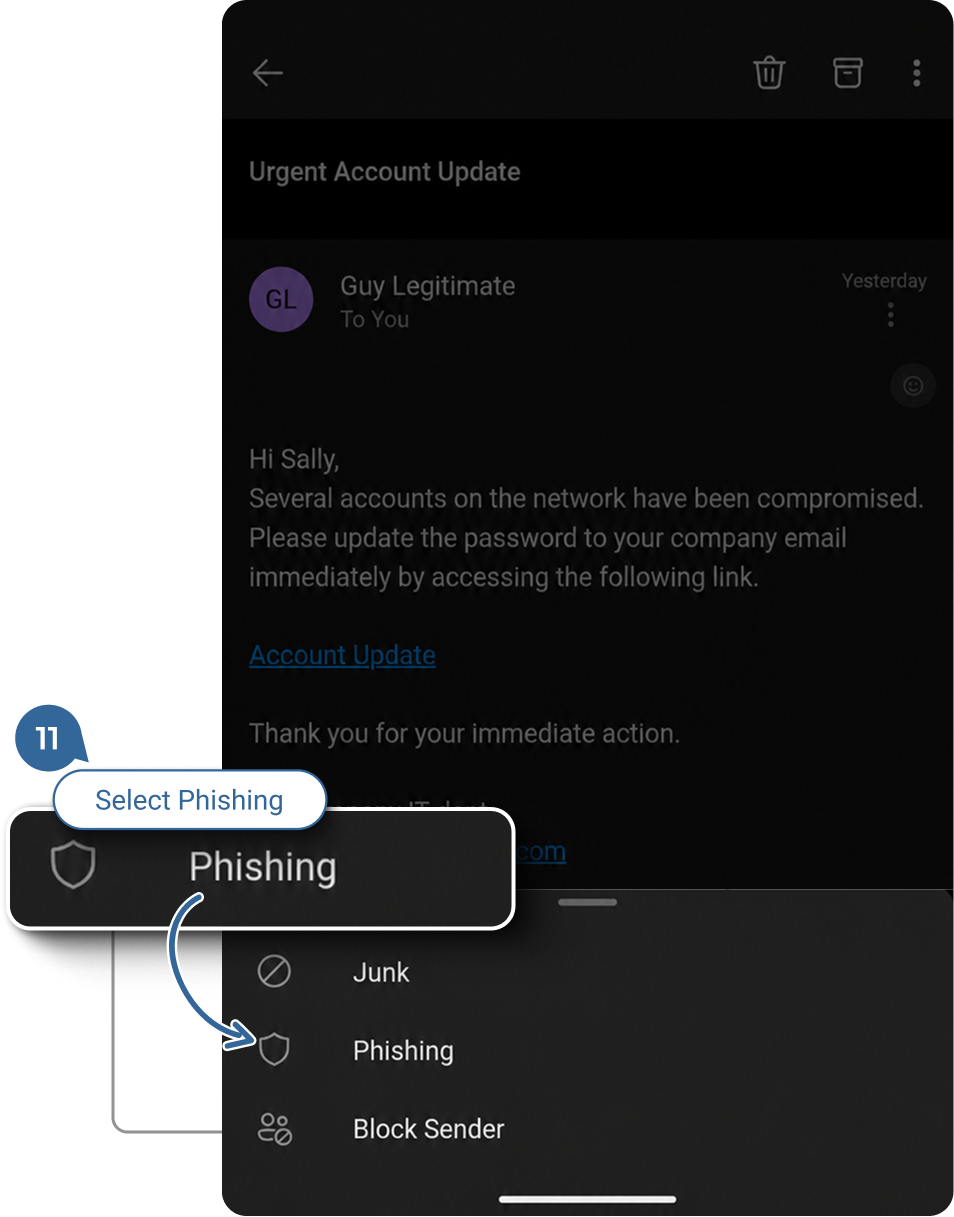
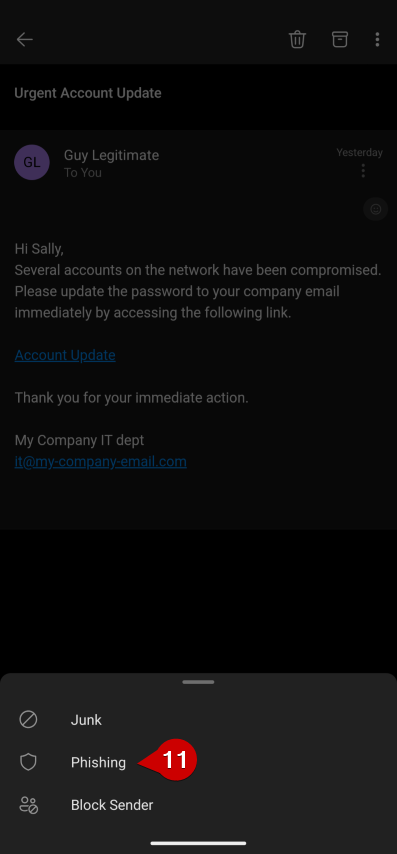
Make your selection: A drawer will open at the bottom of your screen with three options: Junk, Phishing, and Block Sender. Click on “Phishing”.
12.
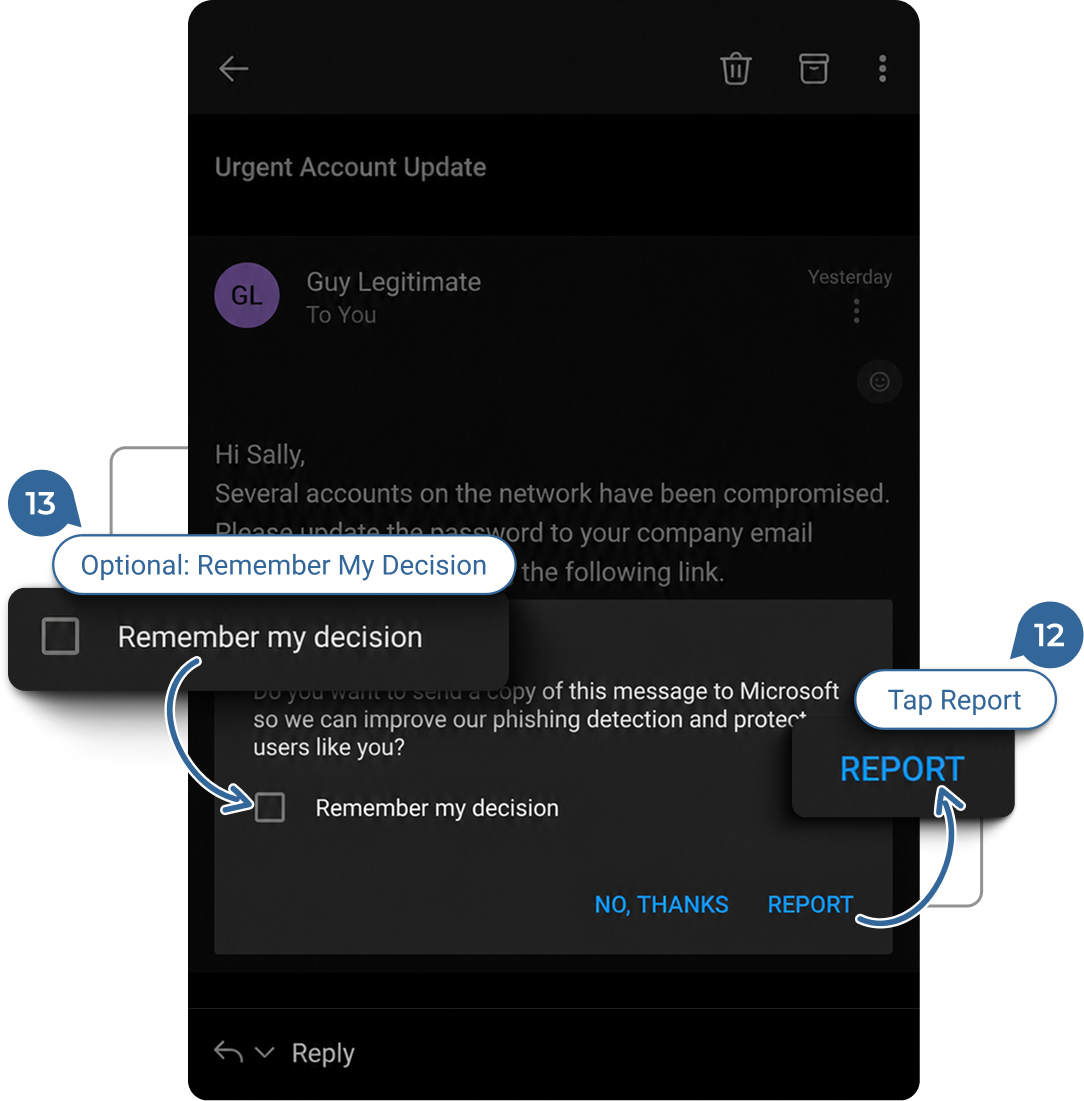
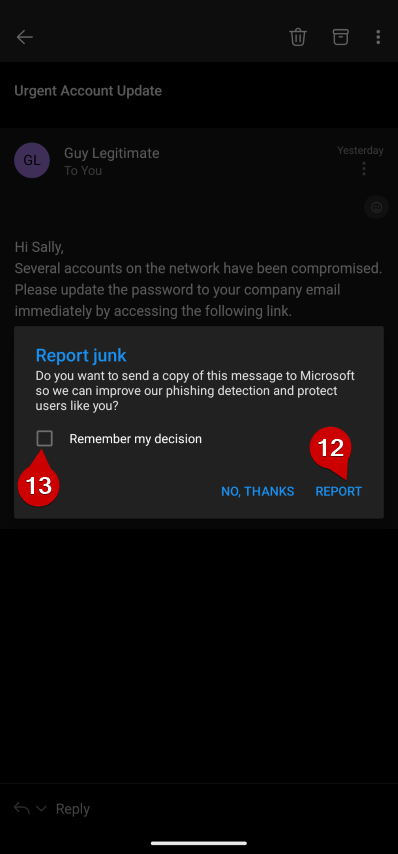
Confirm the Report: After clicking “Phishing” , a popup will ask if you would like to send the email to Microsoft.

Click “REPORT” in the bottom right hand corner of the popup to proceed. The email will be sent to Microsoft and Cole Systems for investigation.

13.
Avoid Skipping Future Notifications: We recommend not selecting “Remember my decision” so you can always double-check before submitting and click on “NO, THANKS” if the report is in error.

Selecting “NO, THANKS” will only stop the report, not action on the email.

14.
Submission and Processing: The reported email message will be submitted for review. The message will automatically be moved to the Deleted folder when “Phishing” is selected, and to the Junk folder if “Junk” is selected.


How to Report Phishing Email Mobile

Next Step

2 / 2

1.

Identify a Suspicious Email

When in Outlook look for these common signs of phishing or malicious emails:
  1. Display Name Doesn’t Match Email Address: The name shown might look familiar, but the email address is different. Tap the sender’s name to see the actual email address.
  2. Hyperlink Text Doesn’t Match the URL: Phishing emails often use deceptive link text. Hold your finger on the hyperlinks to see the actual URL; if it looks suspicious or doesn’t match the expected website, it’s a red flag.
  3. Urgent or Threatening Language: Phishing emails often create a sense of urgency or fear to prompt quick action, such as “Your account will be locked” or “Immediate action required.”

Suspicious Attachments: Unexpected attachments, especially those with extensions like .zip, .exe, or .docm, can be dangerous. Avoid opening attachments you weren’t expecting.


Spelling and Grammar Errors: Phishing emails often contain spelling mistakes or awkward phrasing that wouldn’t be present in legitimate communication.


Requests for Sensitive Information: Legitimate companies will not ask for personal information like passwords, social security numbers, or credit card details via email.


Generic Greetings: Phishing emails often use generic greetings like “Dear Customer” instead of your actual name.


Strange Email Domain: Be cautious if the domain doesn’t match the supposed sender. For example, an email claiming to be from Microsoft but sent from a random domain like “@secure-microsupport.com” is suspicious.

2 / 2

Next Step

2.

Anatomy of a URL (Web Address)

Anatomy of a URL: To better understand what to look for in a suspicious email domain, it’s helpful to understand the anatomy of a URL:

  1. Protocol: This is usually “http” or “https”. Secure websites use “https” with the “s” indicating a secure connection.
  2. Subdomain: This part comes before the main domain, like “mail” in “mail.example.com”. Be wary of strange subdomains, as attackers often add misleading subdomains to appear legitimate.
  3. Domain Name: This is the main part of the URL, such as “example” in “example.com”. Make sure this matches the expected sender.
  4. Top-Level Domain (TLD): This is the extension like “.com”, “.org”, or “.net”. Phishing emails may use unusual TLDs or variations of a familiar one.
  5. Path: The path comes after the domain and specifies a particular page or location on the website. Be cautious if the path looks strange or includes excessive random characters.

2 / 2

Next Step

3.

Report a Suspicious Email as Phishing

Open the “Report Phishing” Tool
  1. Tap on the three dots in the upper most right hand corner: This will open the More Items menu where you can select “Report junk”.
  2. Select “Report junk”: In the menu that pops up, click on “Report Junk”.
  3. Make your selection: A drawer will open at the bottom of your screen with three options: Junk, Phishing, and Block Sender. Click on “Phishing”.
  4. Confirm the Report: After clicking “Phishing”, a popup will ask if you would like to send the email to Microsoft.

    Click “REPORT” in the bottom right hand corner of the popup to proceed. The email will be sent to Microsoft and Cole Systems for investigation.
  5. Avoid Skipping Future Notifications: We recommend not selecting “Remember my decision” so you can always double-check before submitting and click on “NO, THANKS” if the report is in error.

    Selecting “NO, THANKS” will only stop the report, not action on the email.
  6. Submission and Processing: The reported email message will be submitted for review. The message will automatically be moved to the Deleted folder when “Phishing” is selected, and to the Junk folder if “Junk” is selected.
2 / 2

Next Step

Next Step

2 / 2

Get Started

Ready to Make Your IT Easier to Manage?

Talk to Cole Systems about your current technology challenges, security concerns, backup needs, or infrastructure goals. We’ll help you understand what needs attention and recommend practical next steps for your business.