Cole Systems Inc.

How to Remote Access

Accept Invitation and Create Account

This guide provides step-by-step instructions for accepting an End User invitation to NinjaOne, setting up Multi-Factor Authentication (MFA) using SMS, and accessing a device using NinjaOne Remote.
If you’ve already set up your account, skip directly to Page 3 “Login to NinjaOne”.
1.
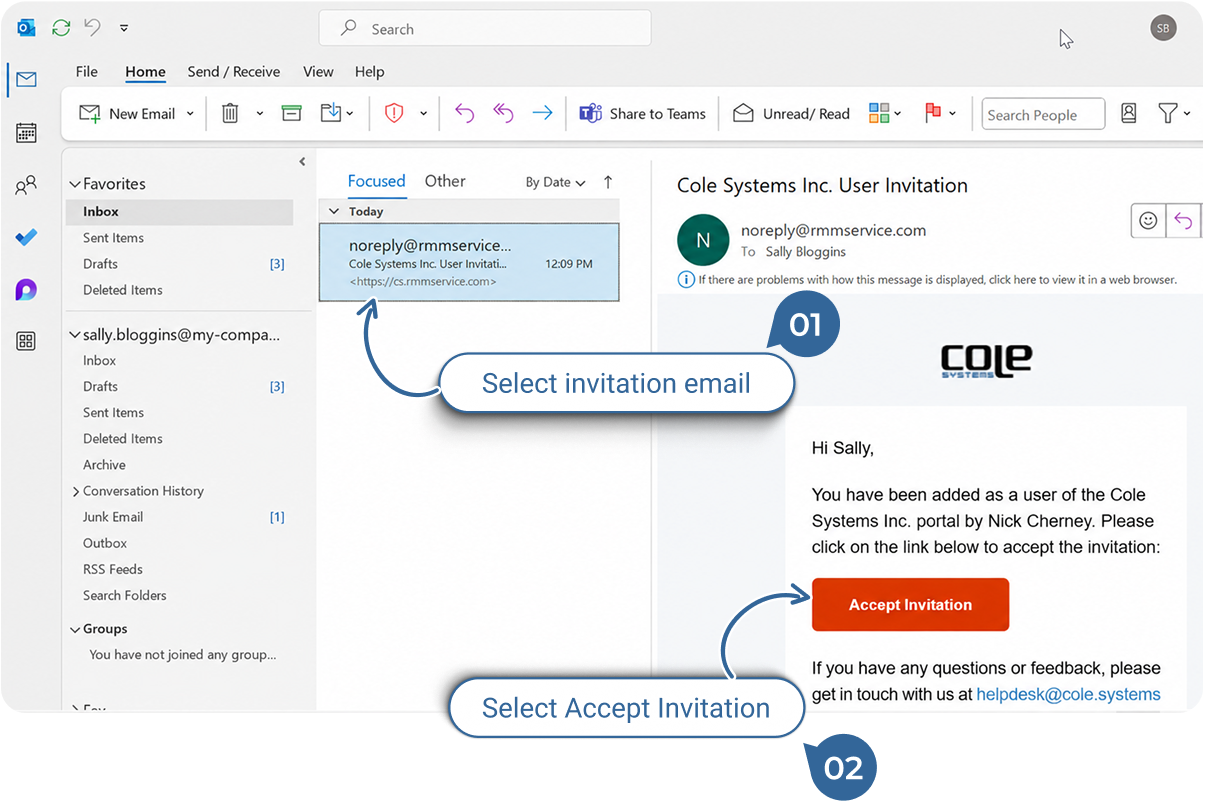
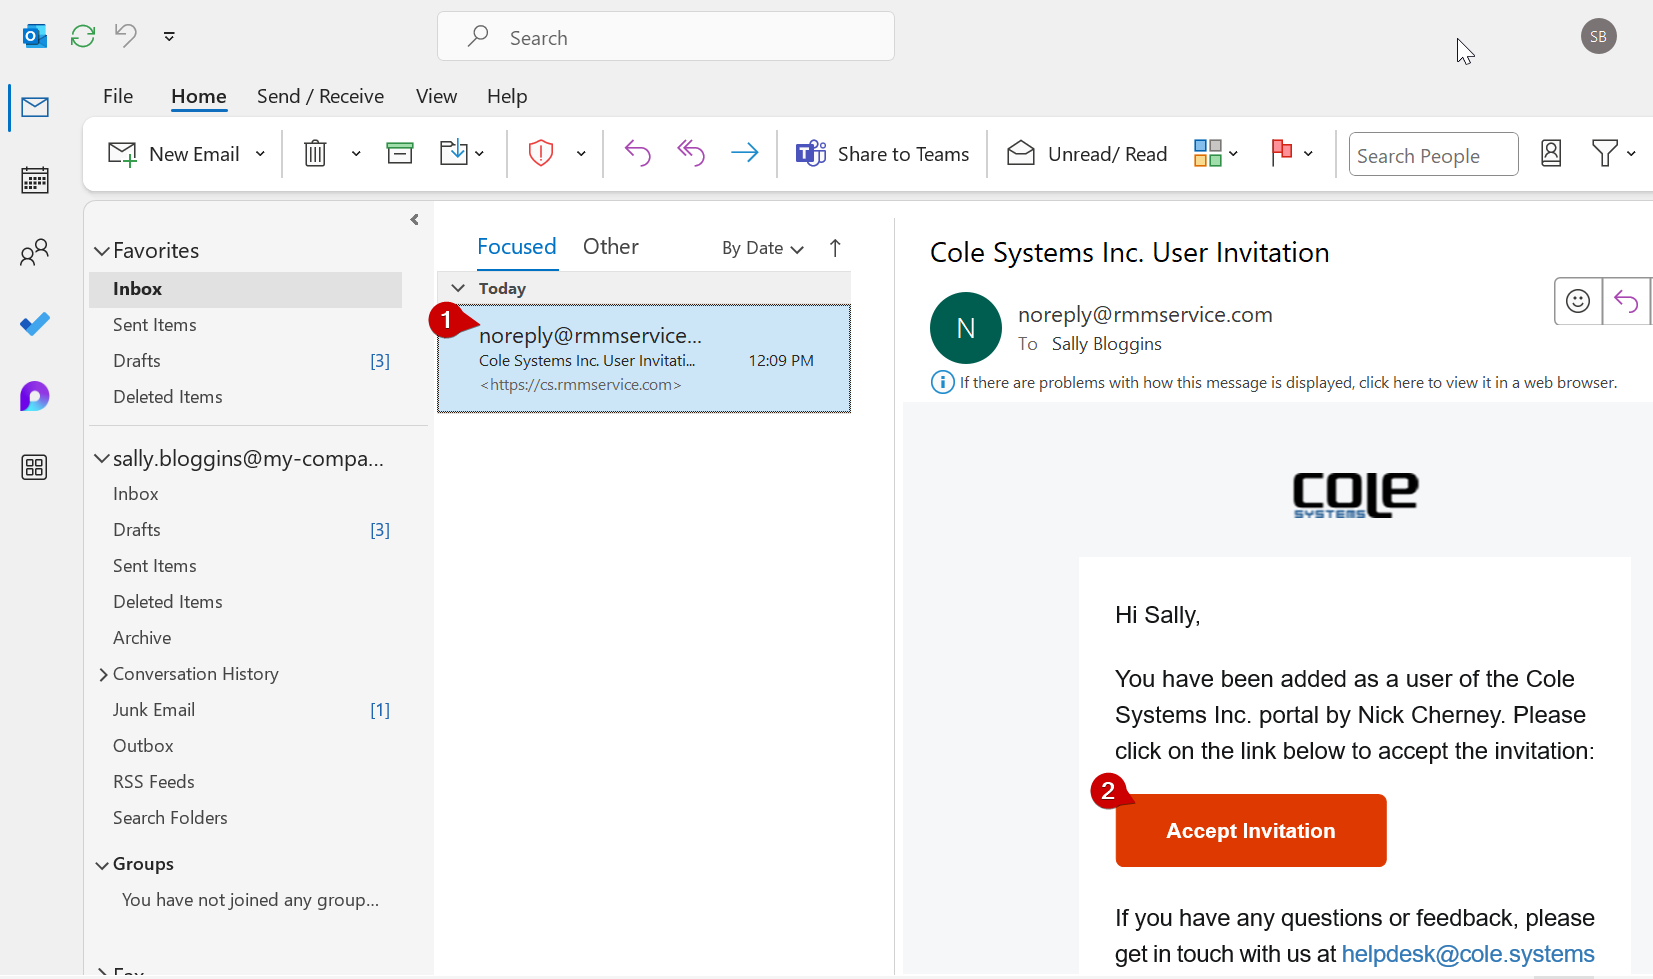
Check Your Email: > Look for an invitation email from Cole Systems “noreply@rmmservice.com”.
2.
Open the Invitation: Click the link labeled “Accept Invitation” to open the password entry form in your browser.
3.
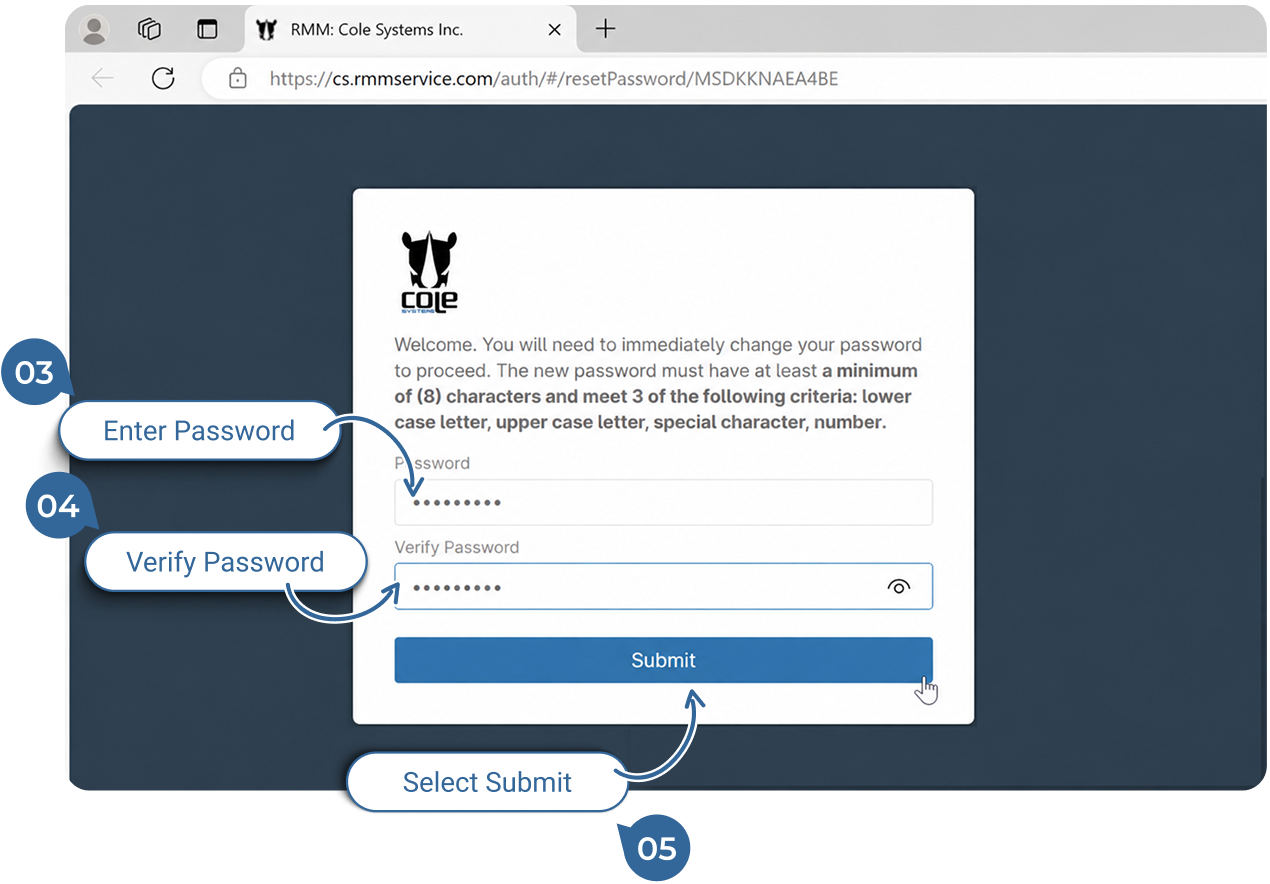
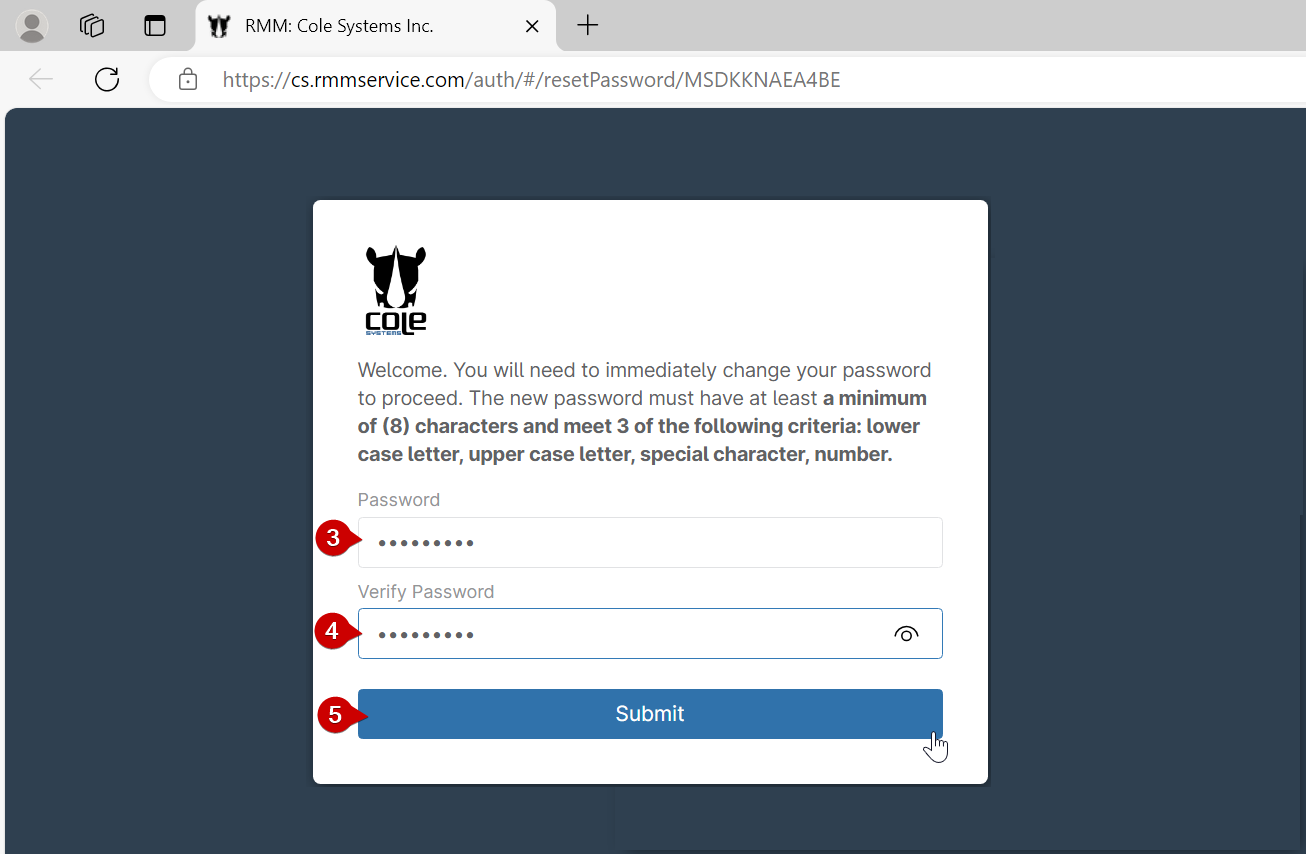
Initiate Your Account: Set up your account by creating a strong password.
4.
Confirm Your Password: Re-enter the same password for confirmation.
5.
Submit the Password: Click on Submit to send your newly selected password to NinjaOne.

Set Up Multi-Factor Authentication (MFA)

You will be directed to the Multi Factor Authentication (MFA) Setup page to select a method of authentication.
If you’ve already set up your account, skip directly to Page 3 “Login to NinjaOne”.
6.
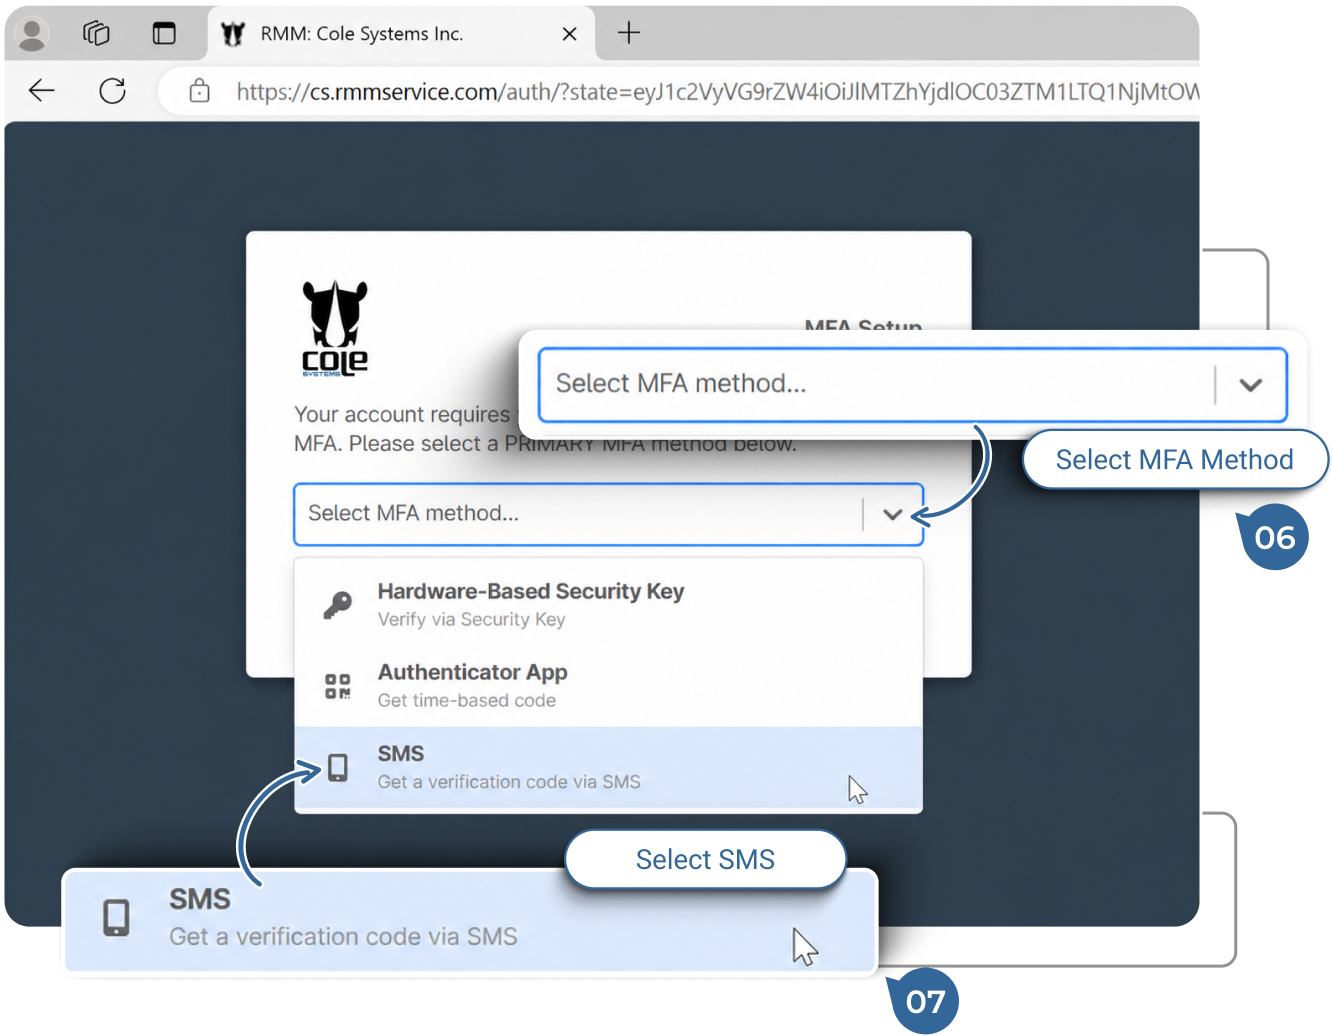
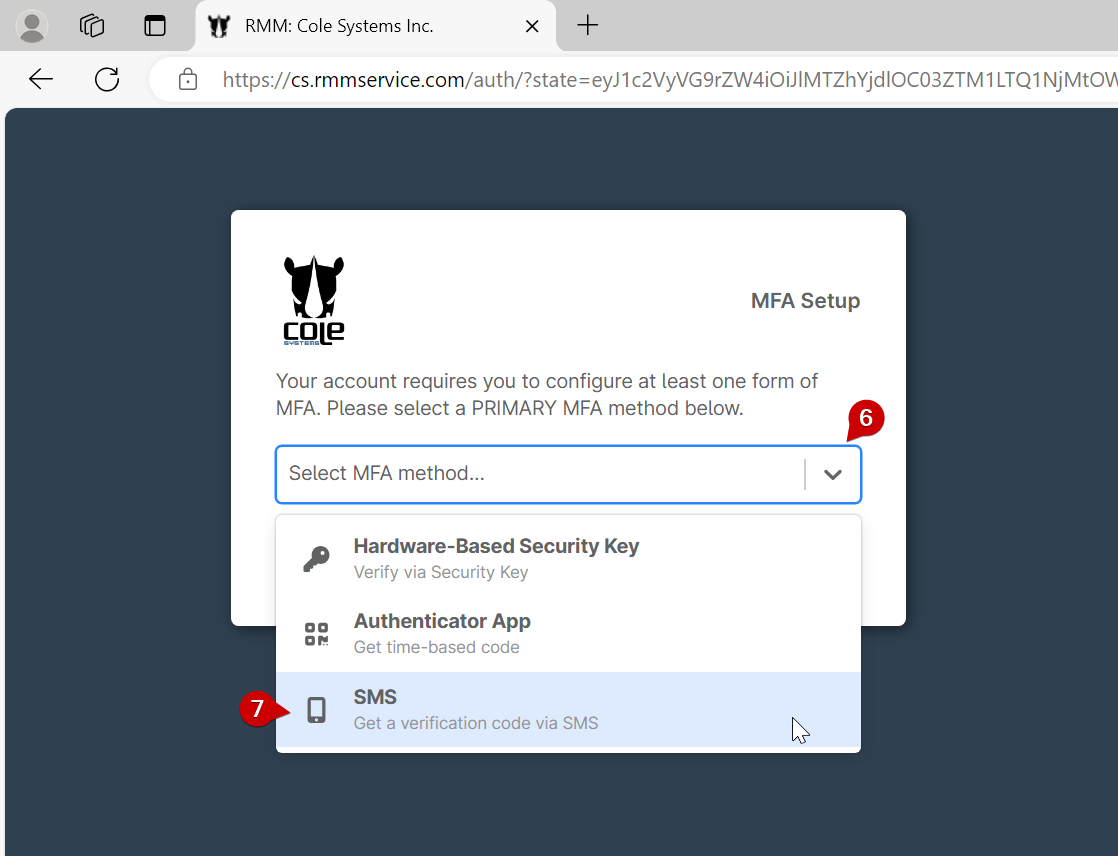
MFA Selection: Click on the MFA method dropdown.
7.
Select SMS Authentication: Choose SMS as your preferred authentication method.
8.
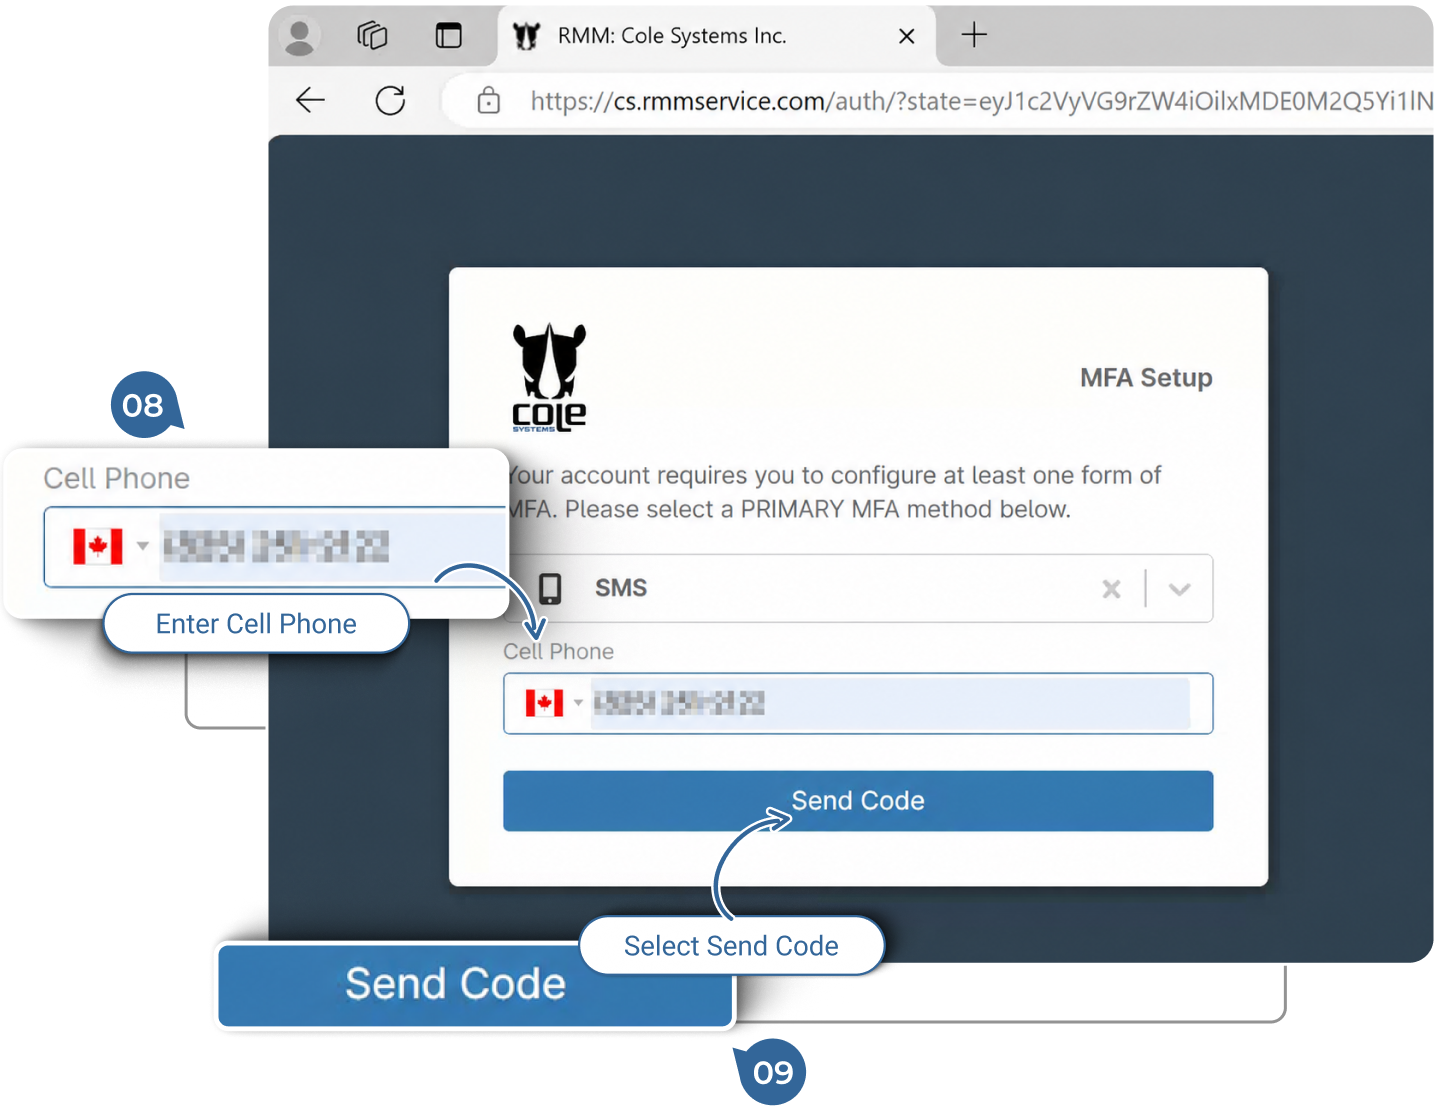
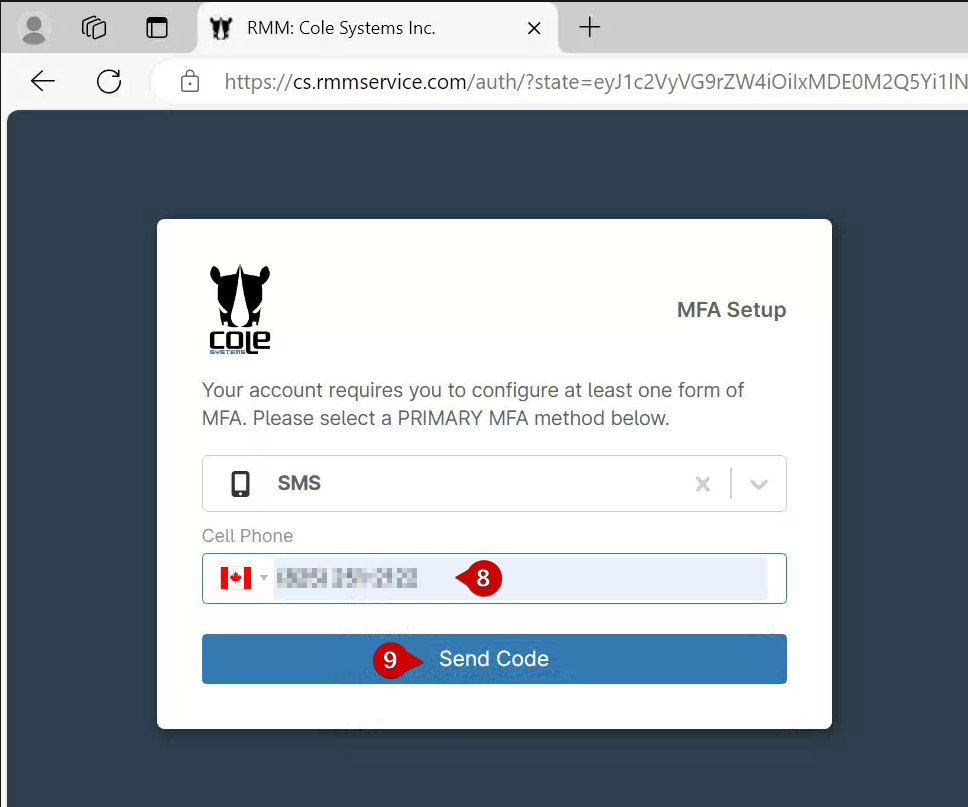
Enter Your Phone Number : Input your mobile phone number in the “Cell Phone” field.
9.
Send Code: Click “Send Code” to send the 6 digit code to your cell phone.
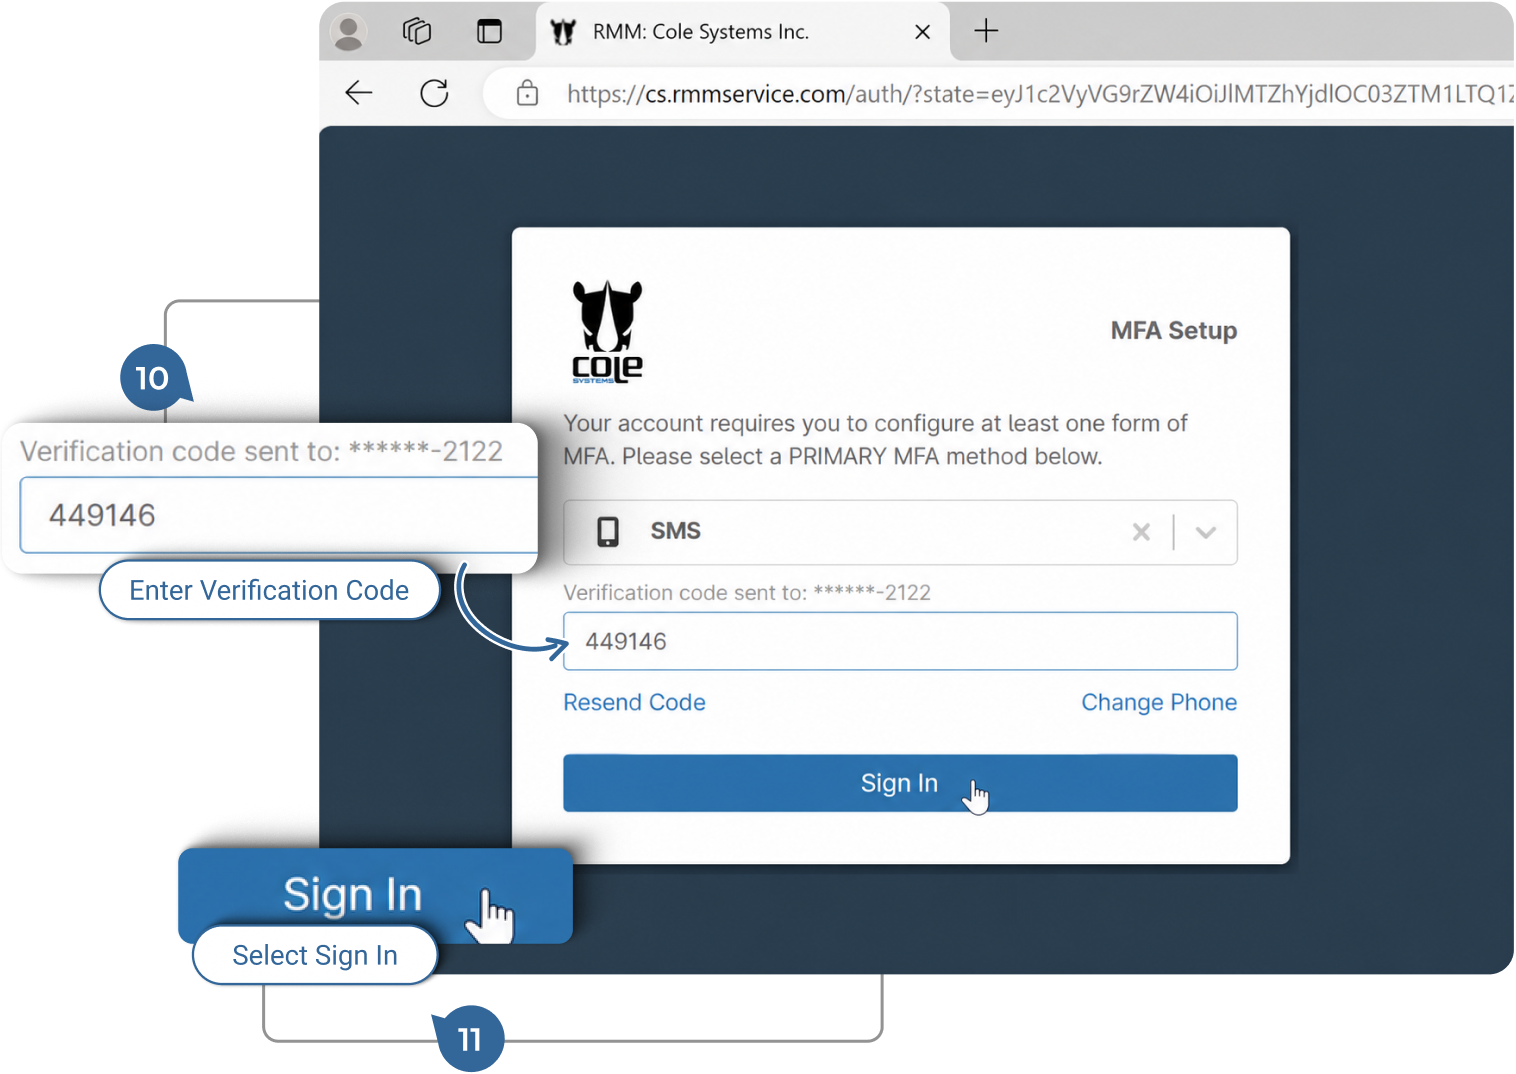
10.
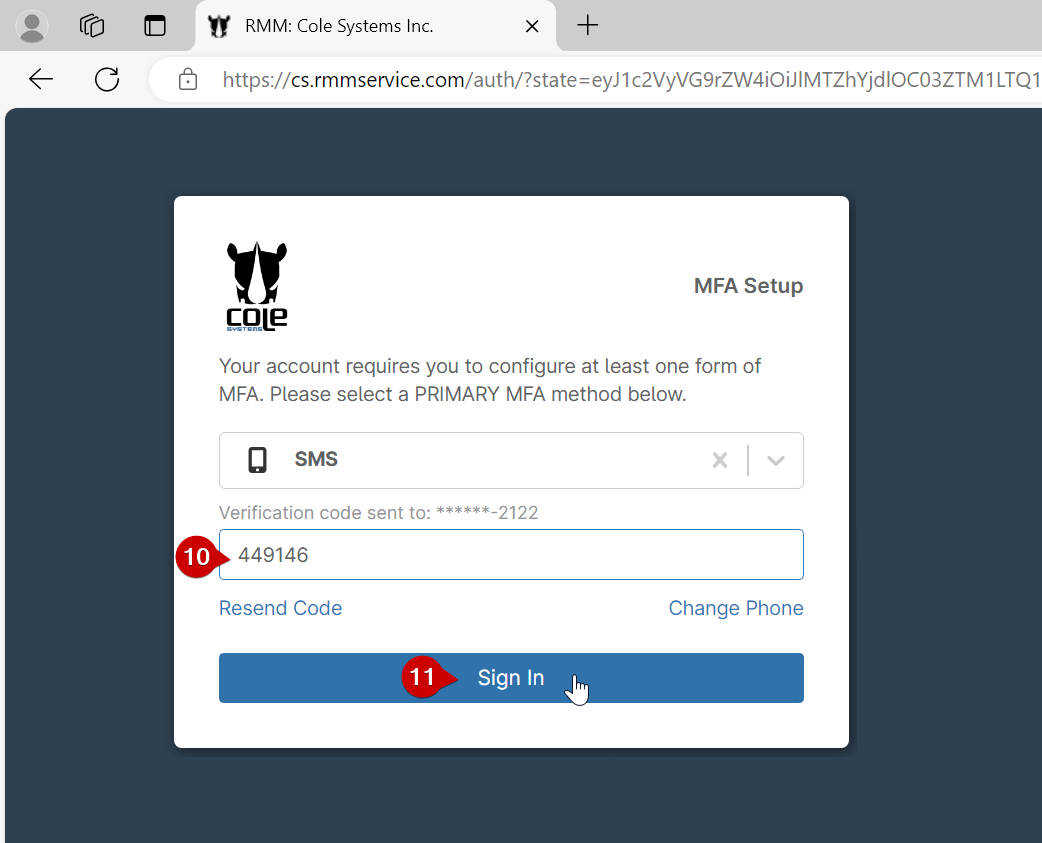
Verify the Code: Check your phone for an SMS code and enter it into the verification field.
11.
Sign In : Confirm the code and click on “Sign In”.

Login to NinjaOne

Log In to NinjaOne with your credentials and MFA Code.
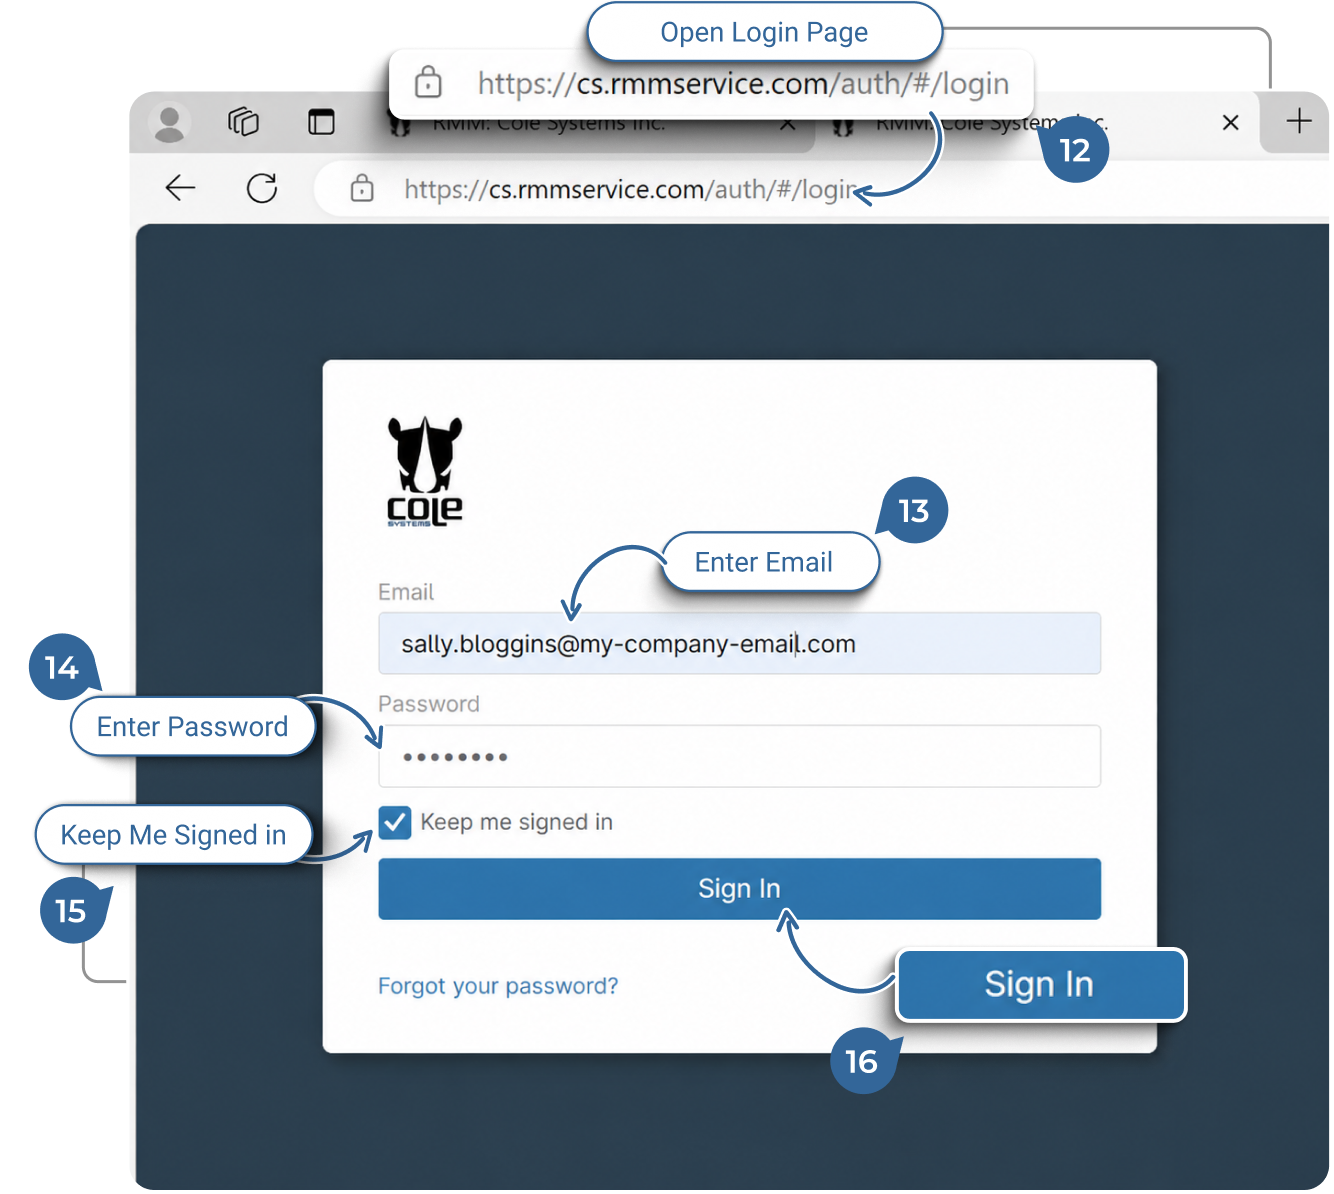
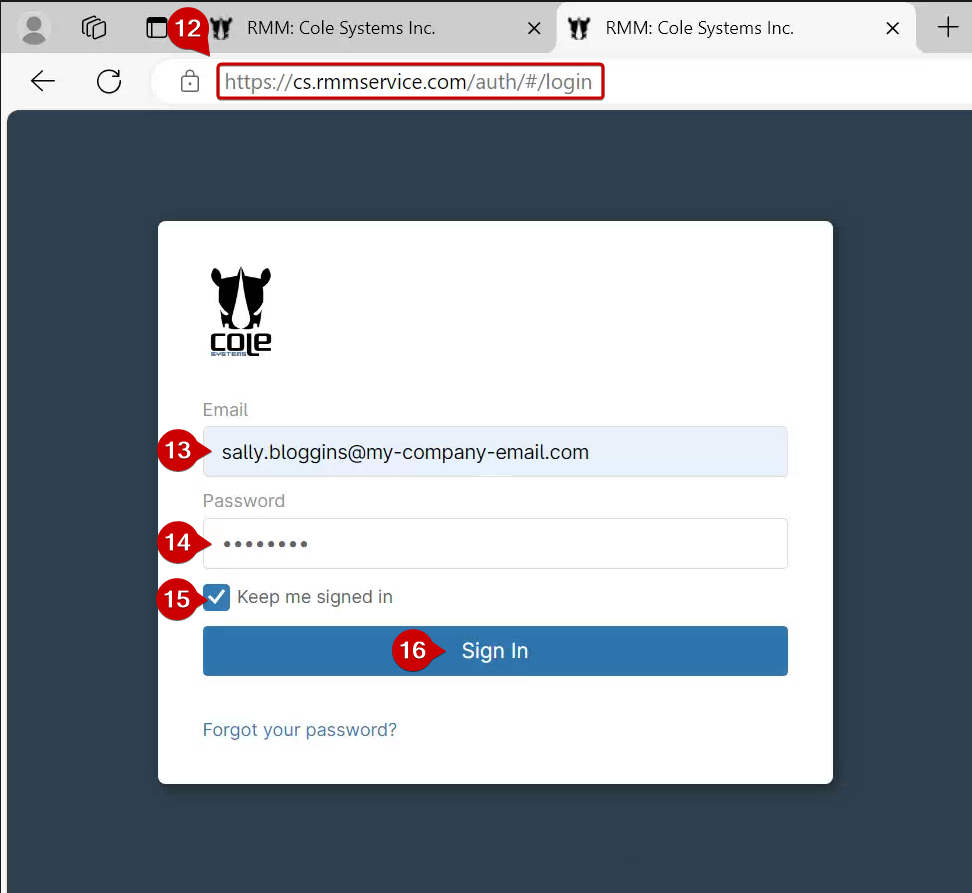
12.
Site Address: Enter the NinjaOne site address in your browser. https://cs.rmmservice.com/
13.
Username: Enter your email address for your username.
14.
Password: Enter your password.
15.
Keep me signed in: To reduce the amount of times you are asked to sign in and verify, check “Keep me signed in”.
16.
Sign In: Click on “Sign In”.

Install NinjaOne Remote

Install the NinjaOne Remote Application.
If you have already installed the NinjaOne Remote application skip steps 17 – 21 and go to Page 5 “Connect to Remote Computer”.
17.
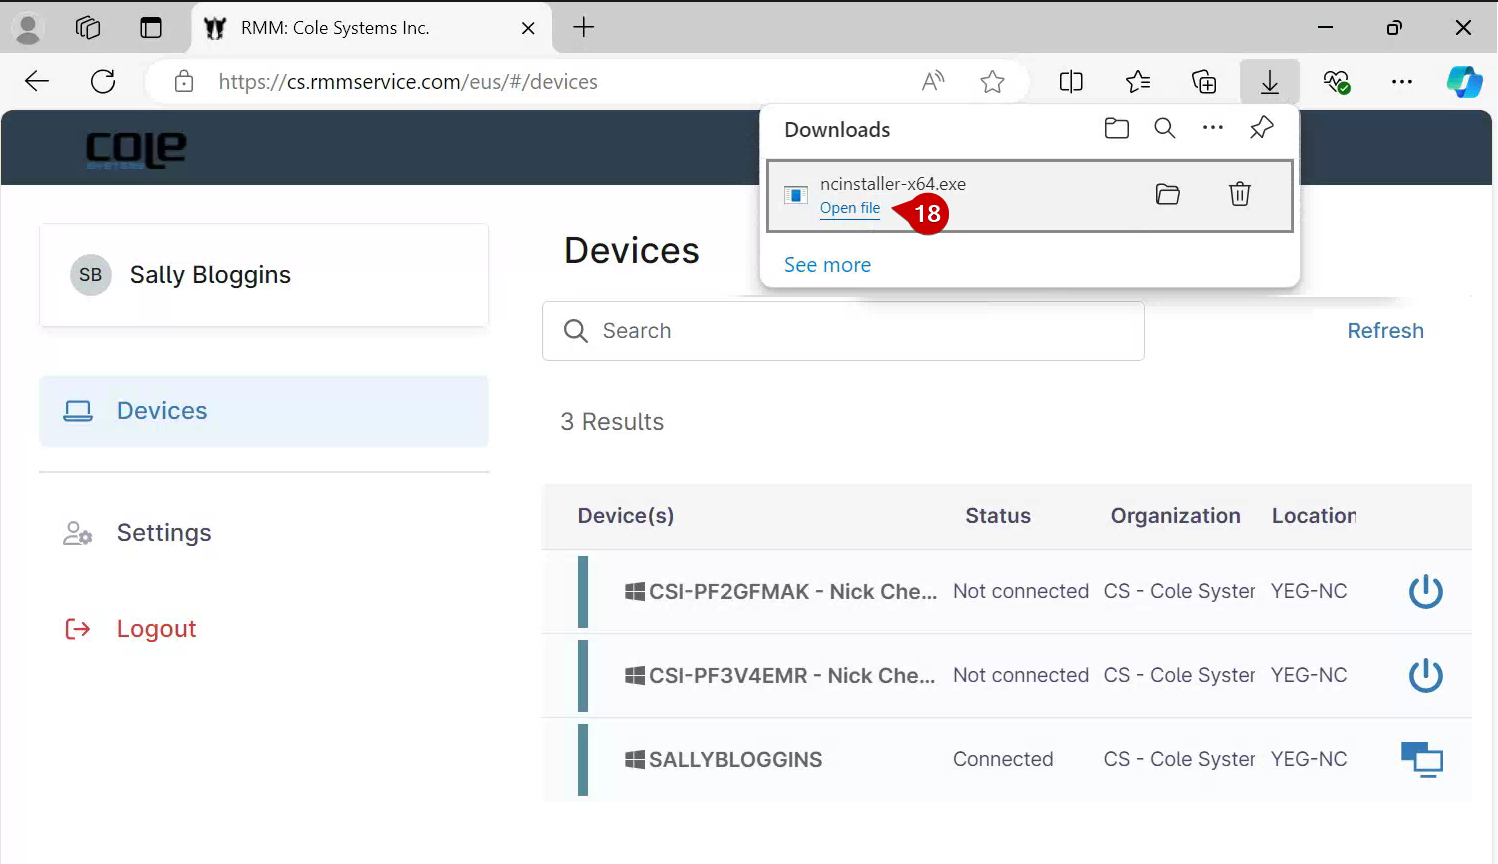
Download the NinjaOne Remote App: If this is your first time accessing a device, download and install the Ninja Remote client from the appropriate link below.
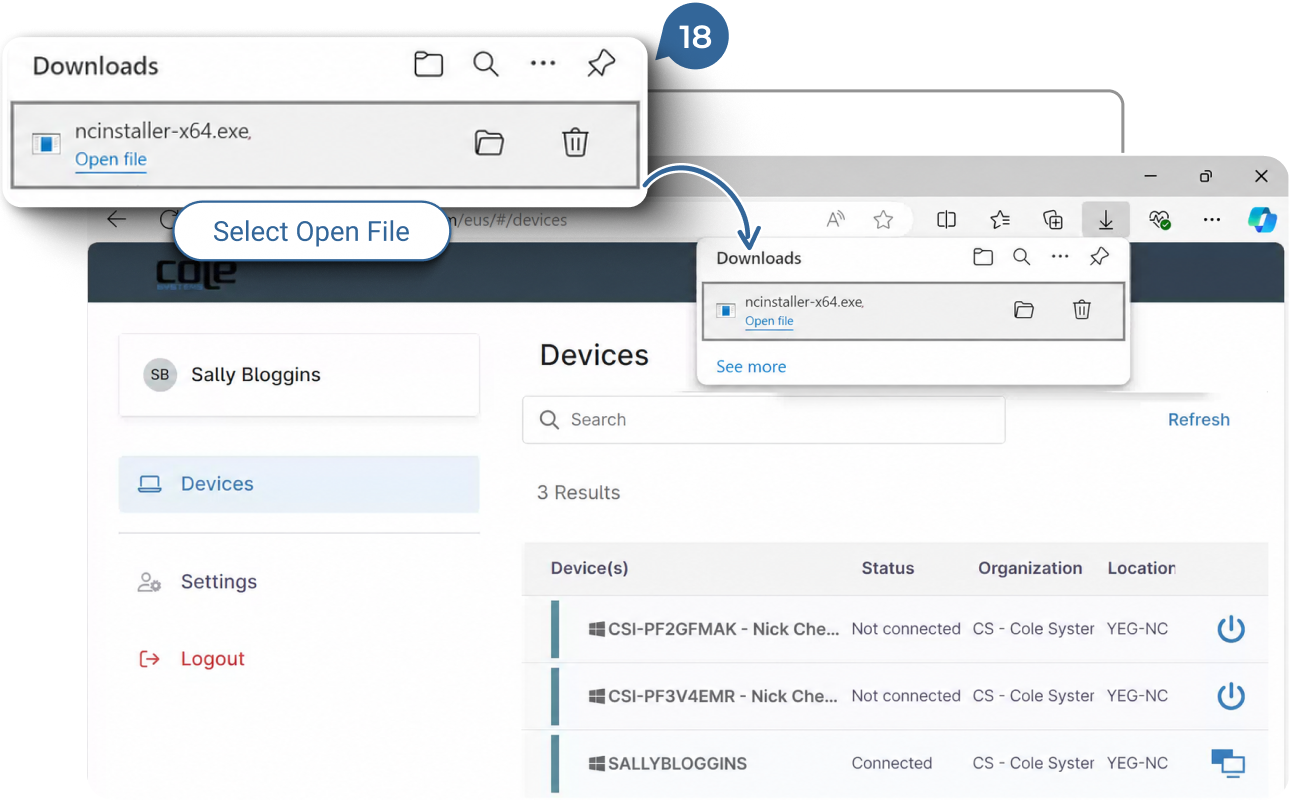
18.
Install the Application: Click on the downloaded file to start the install process.
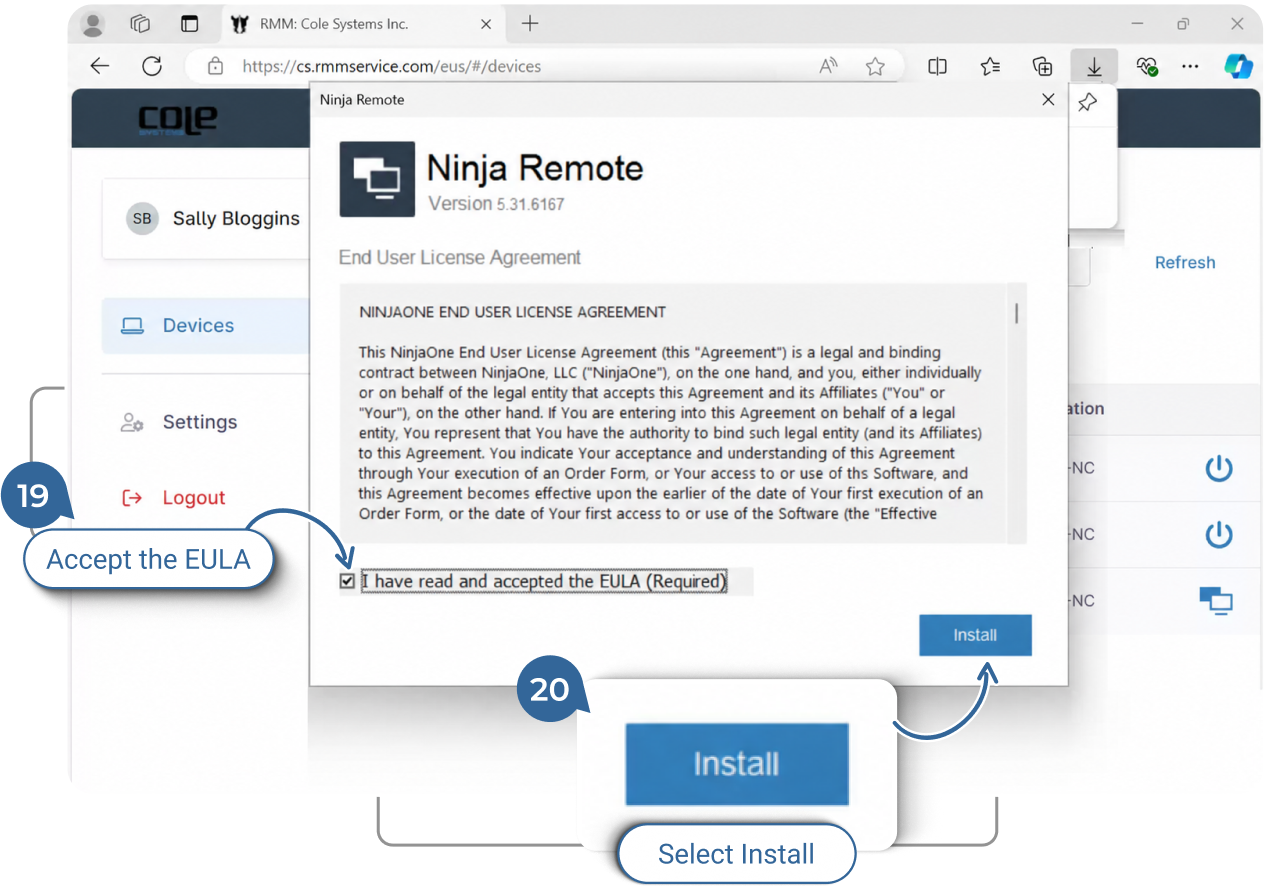
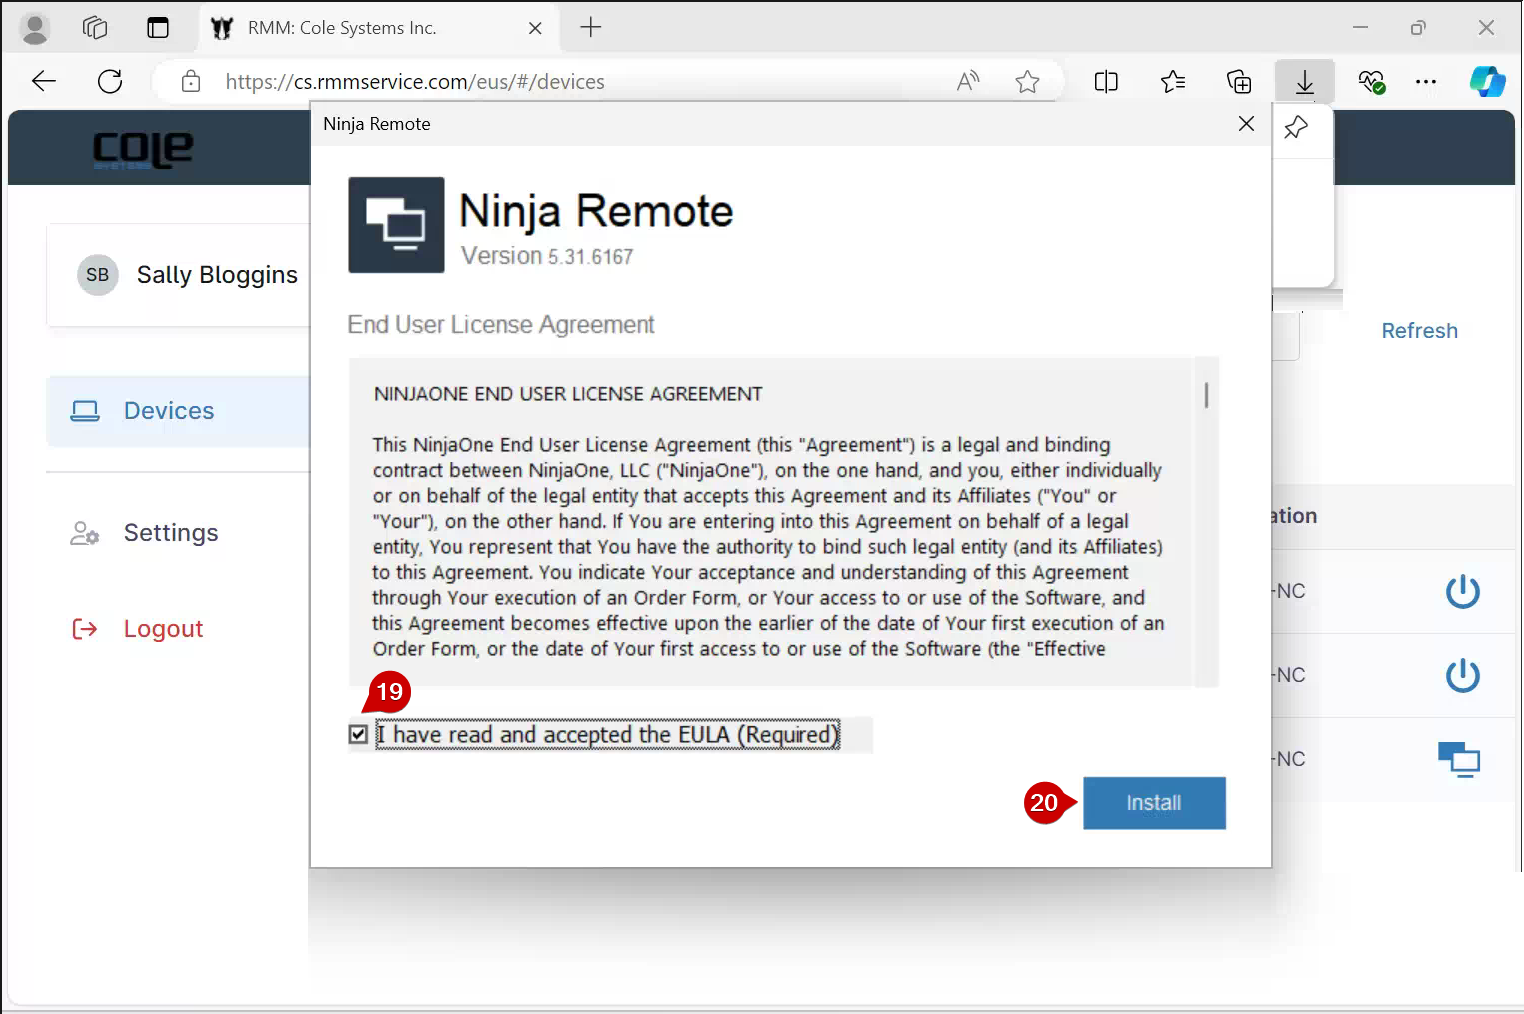
19.
Accept the agreement: Check “I have read and accepted the EULA (Required)”.
20.
Install: Click on the Install button in the bottom right-hand corner of the install window.
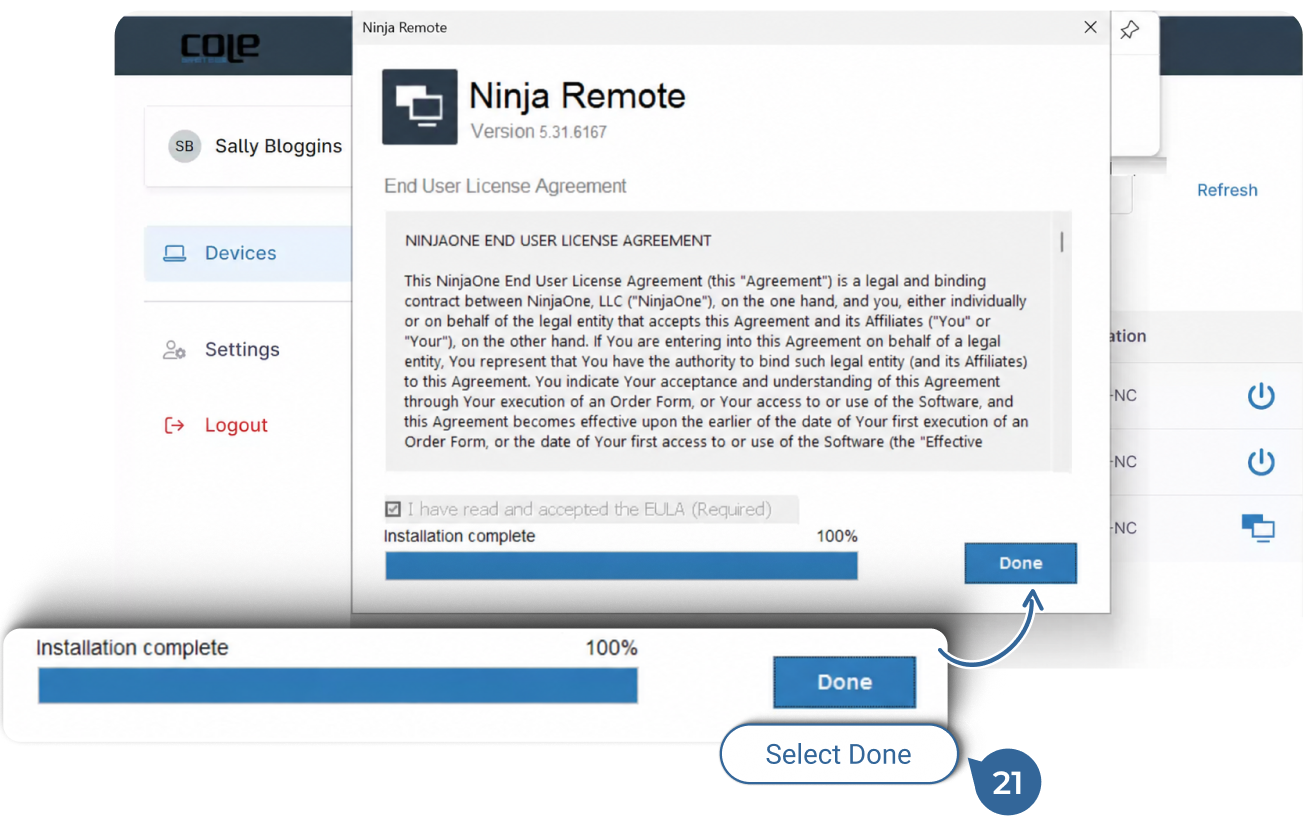
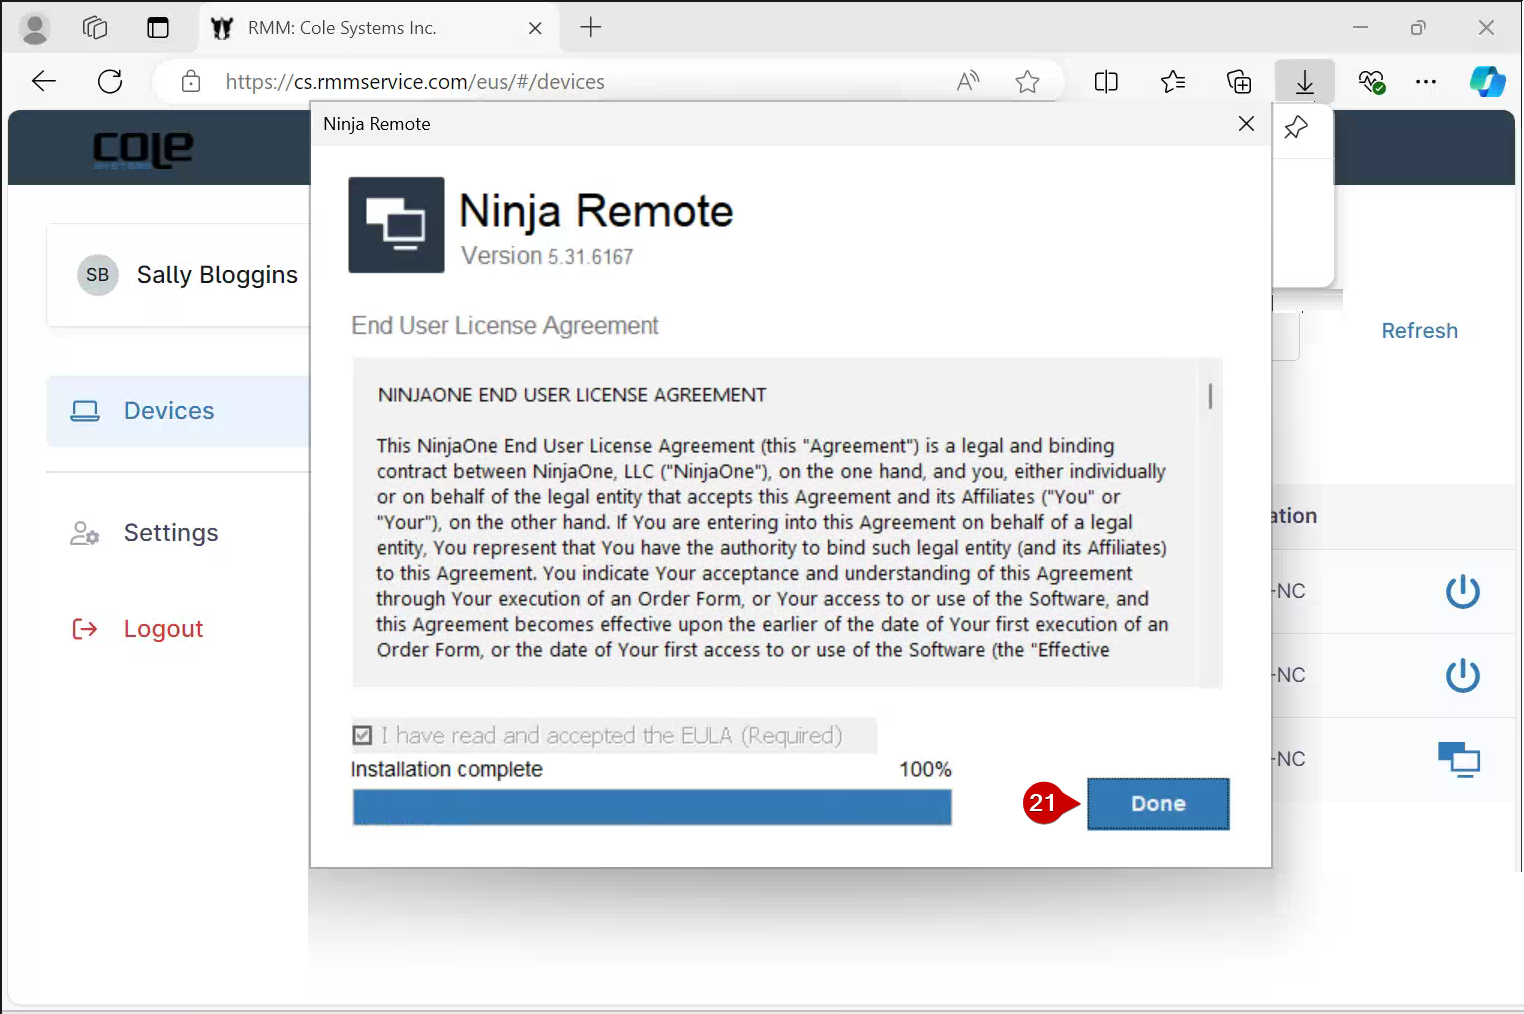
21.
Close Installation: Close the installation window by selecting “Done”.

Connect to Remote Computer

Locate the remote computer and initiate your remote session.
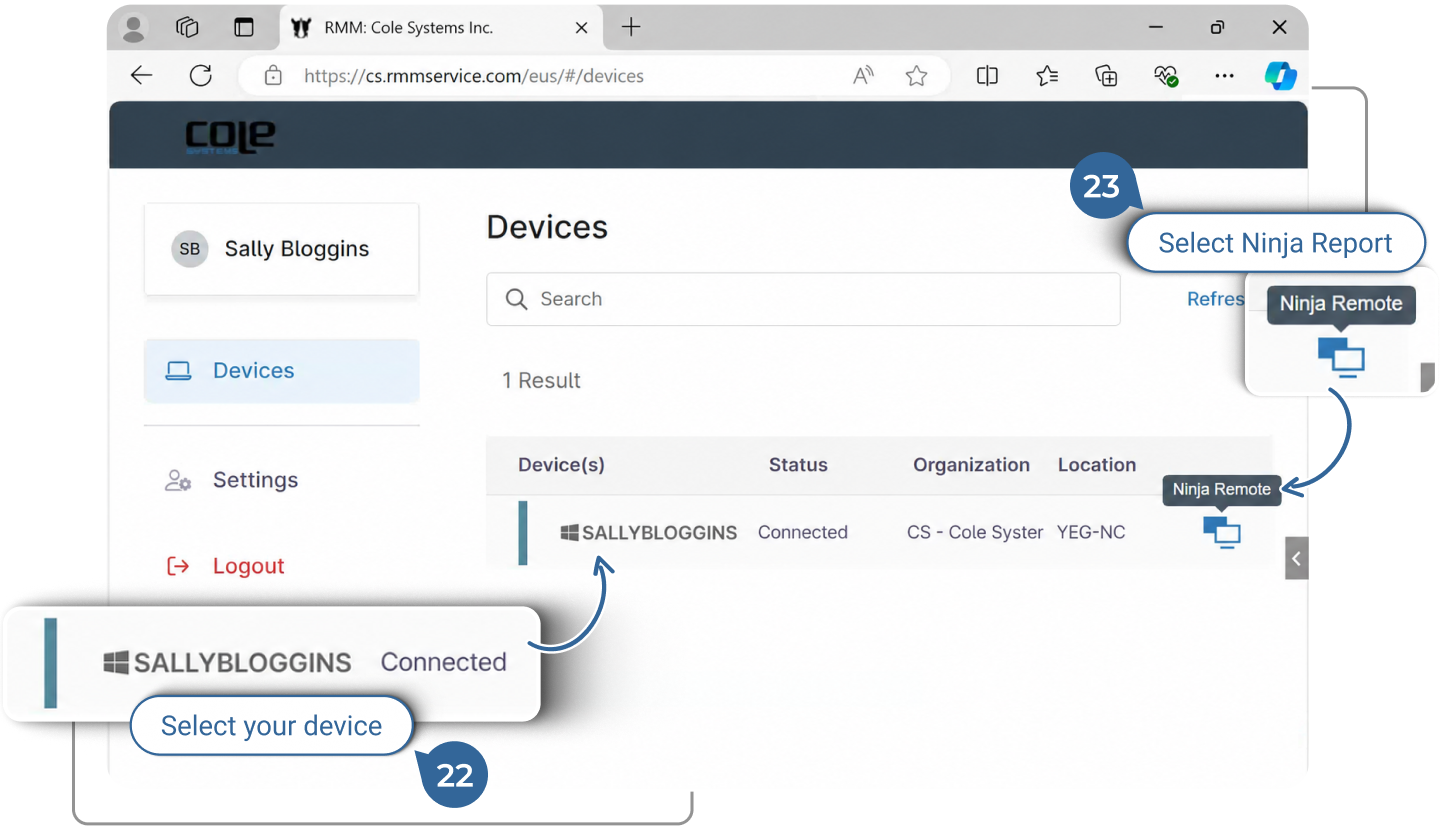
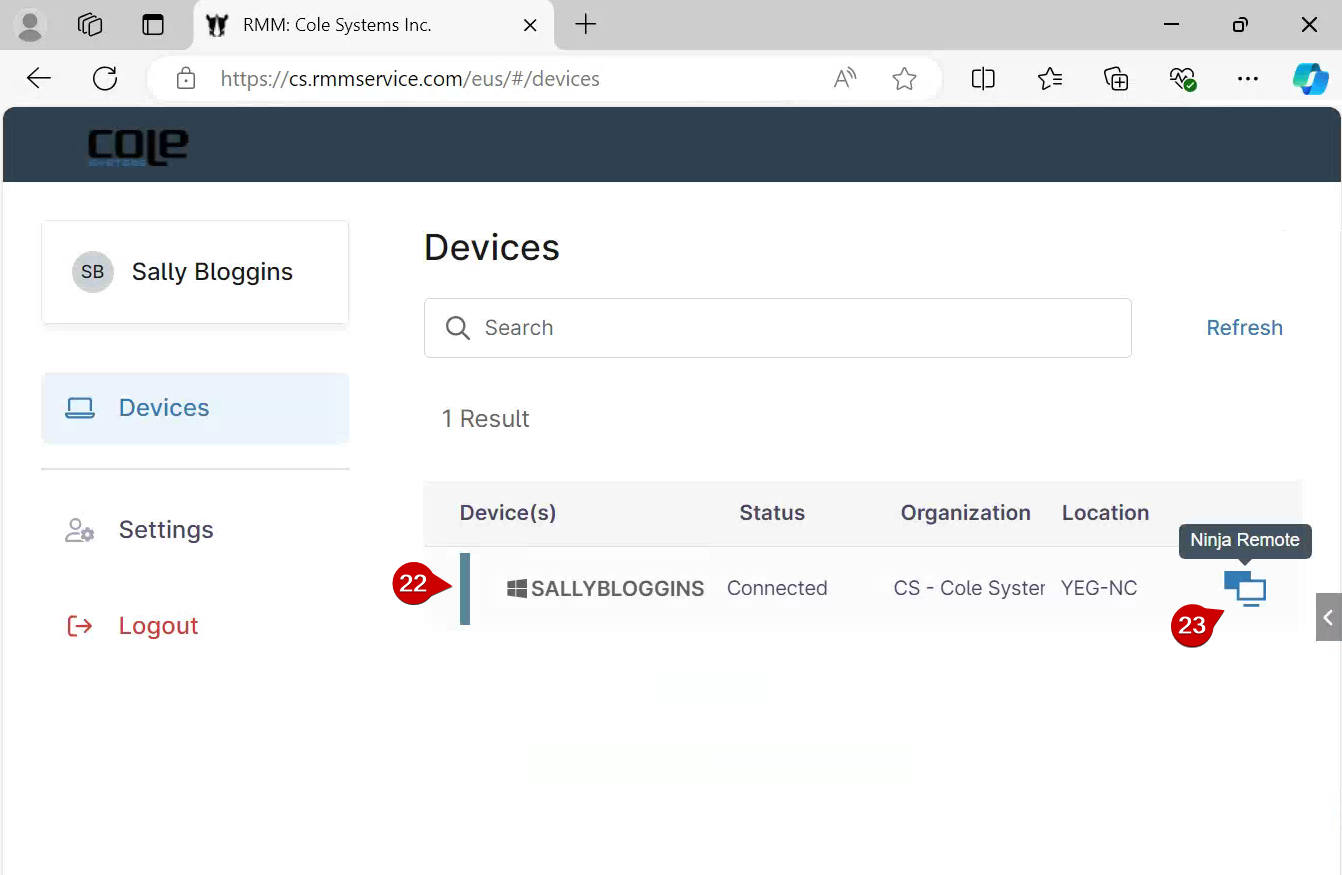
22.
Find the Device: Locate the device you need to access from the NinjaOne dashboard.
23.
Initiate Remote Access: Click on the NinjaOne Remote icon to open the connection.
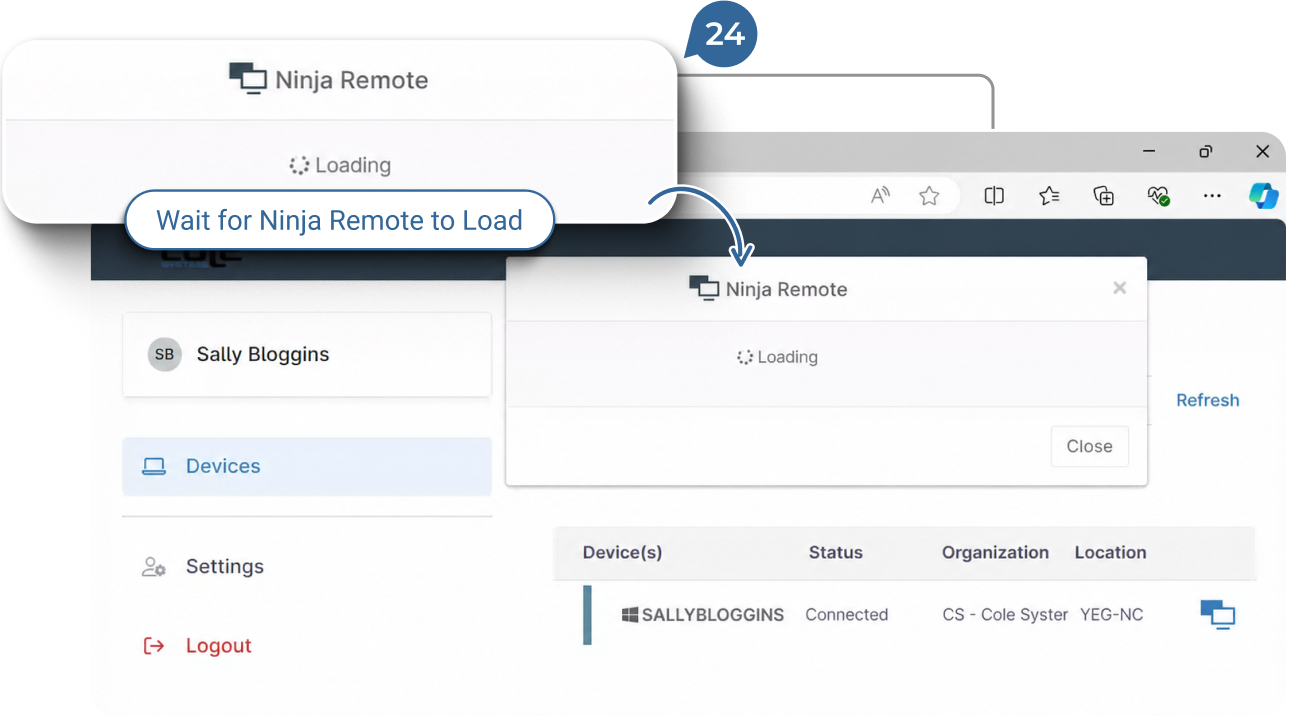
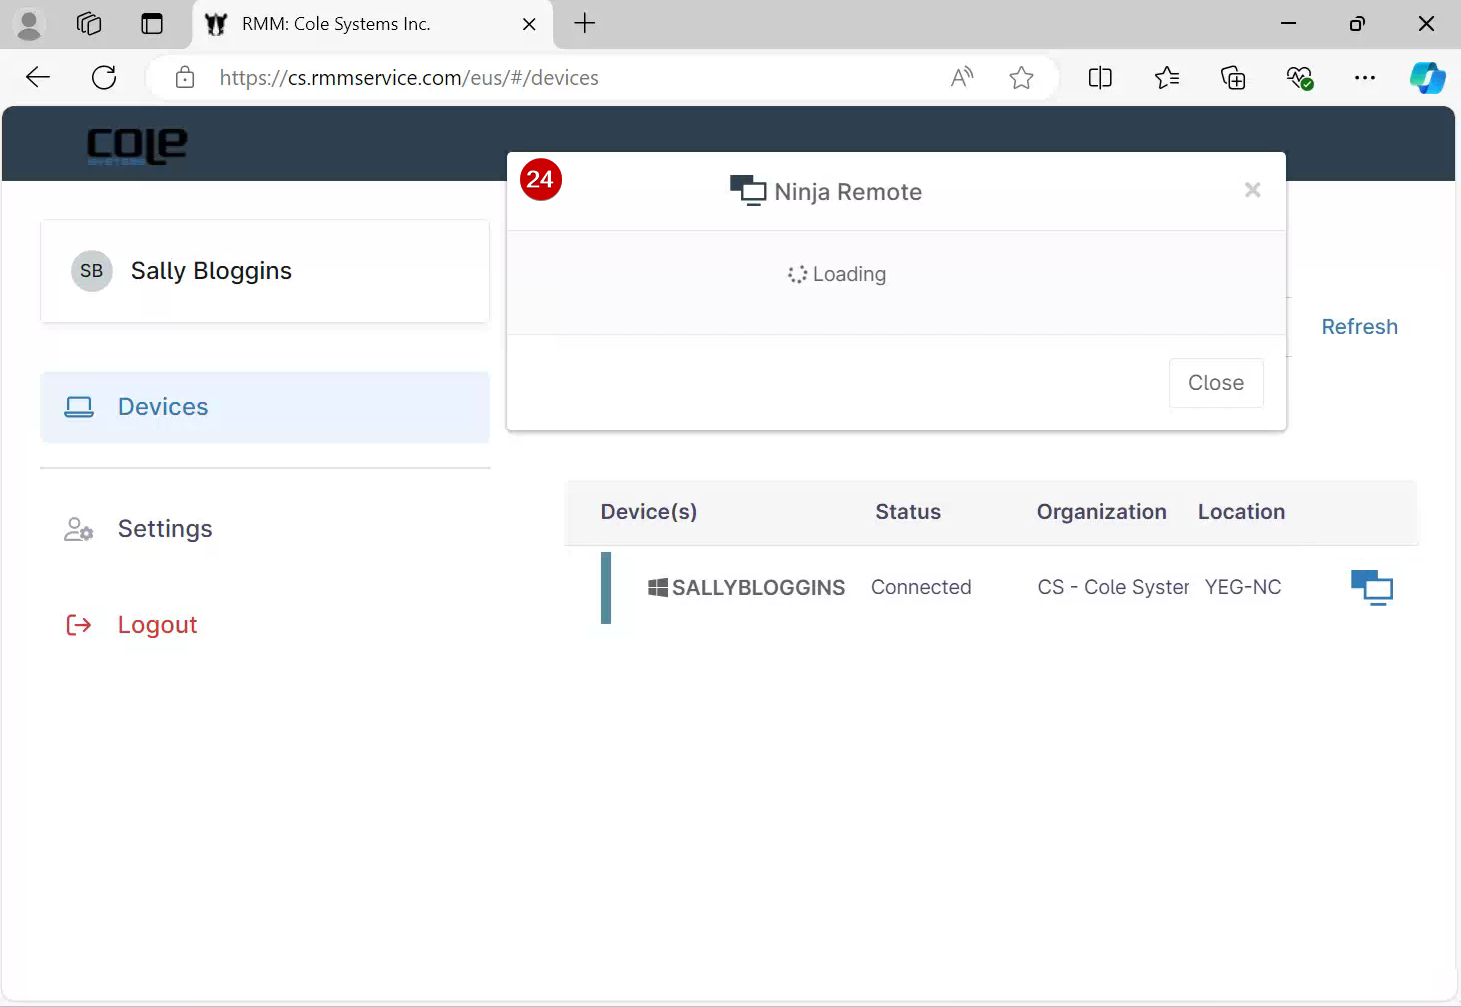
24.
Start the Remote Session: A new window will open indicating that the Remote session is loading.
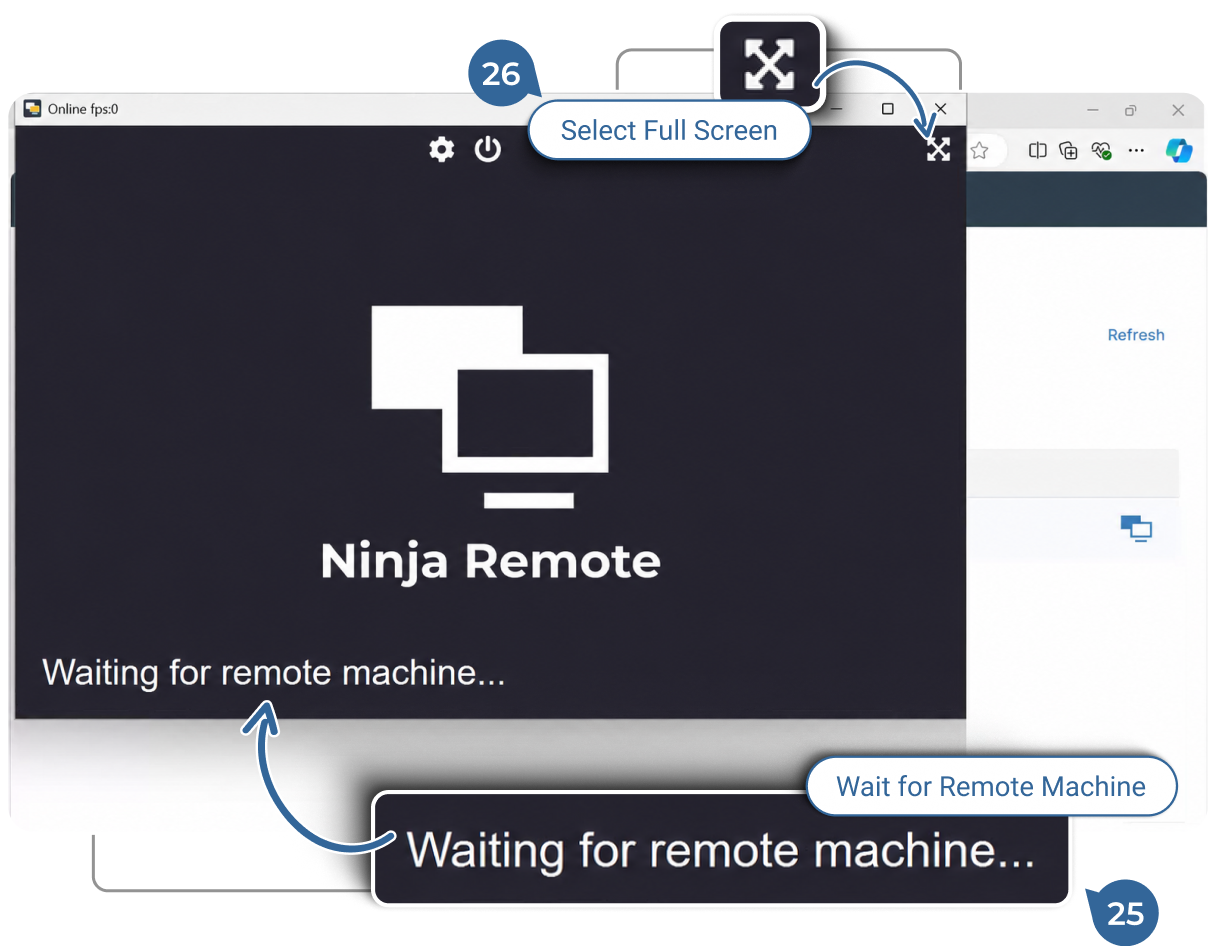
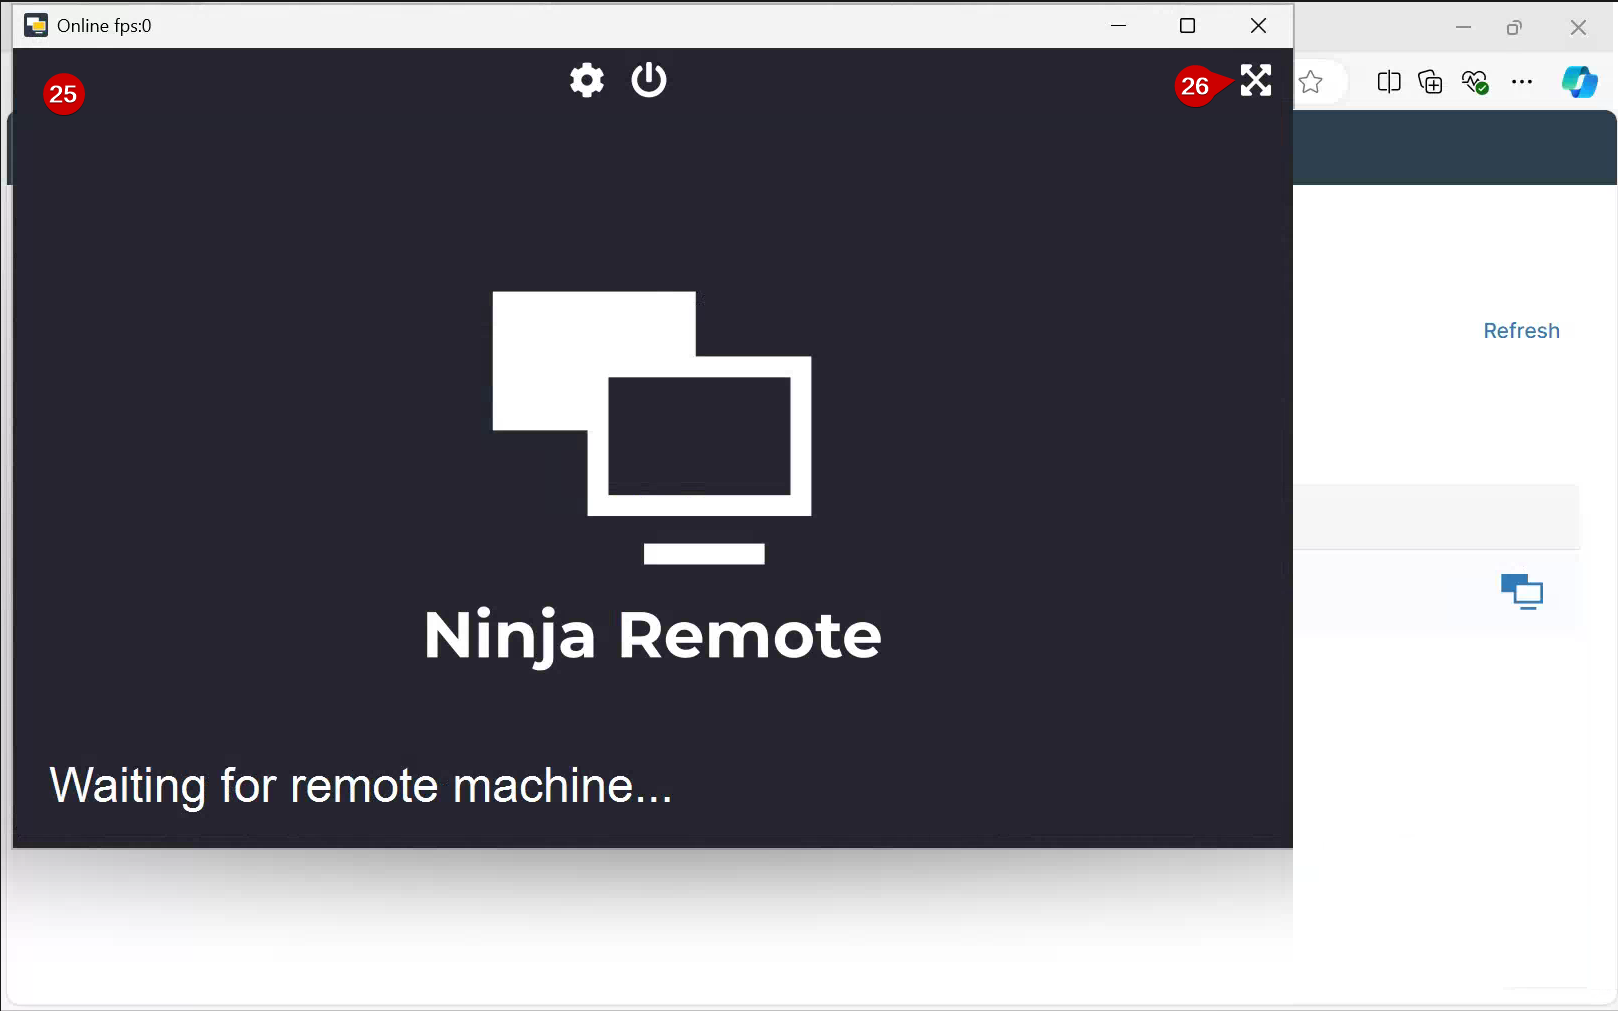
25.
Remote Session Window: Your remote session window will open and display the desktop of the remote device.
26.
Full Screen: Make your remote window full screen by clicking on the X made of arrows located in the upper right-hand corner.

End the Remote Session

End your remote session and logout of NinjaOne.
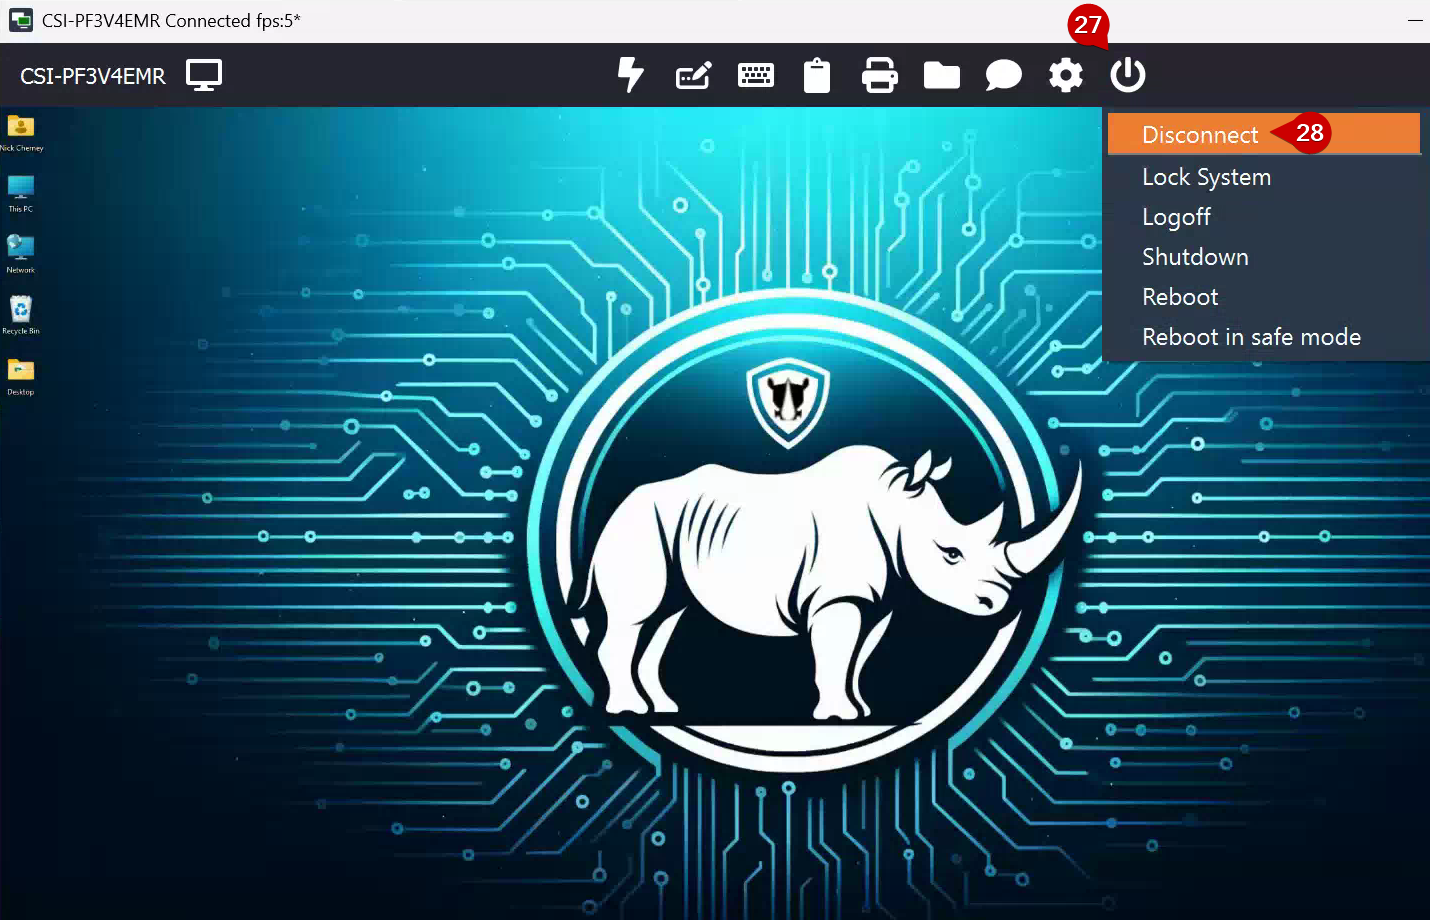
27.
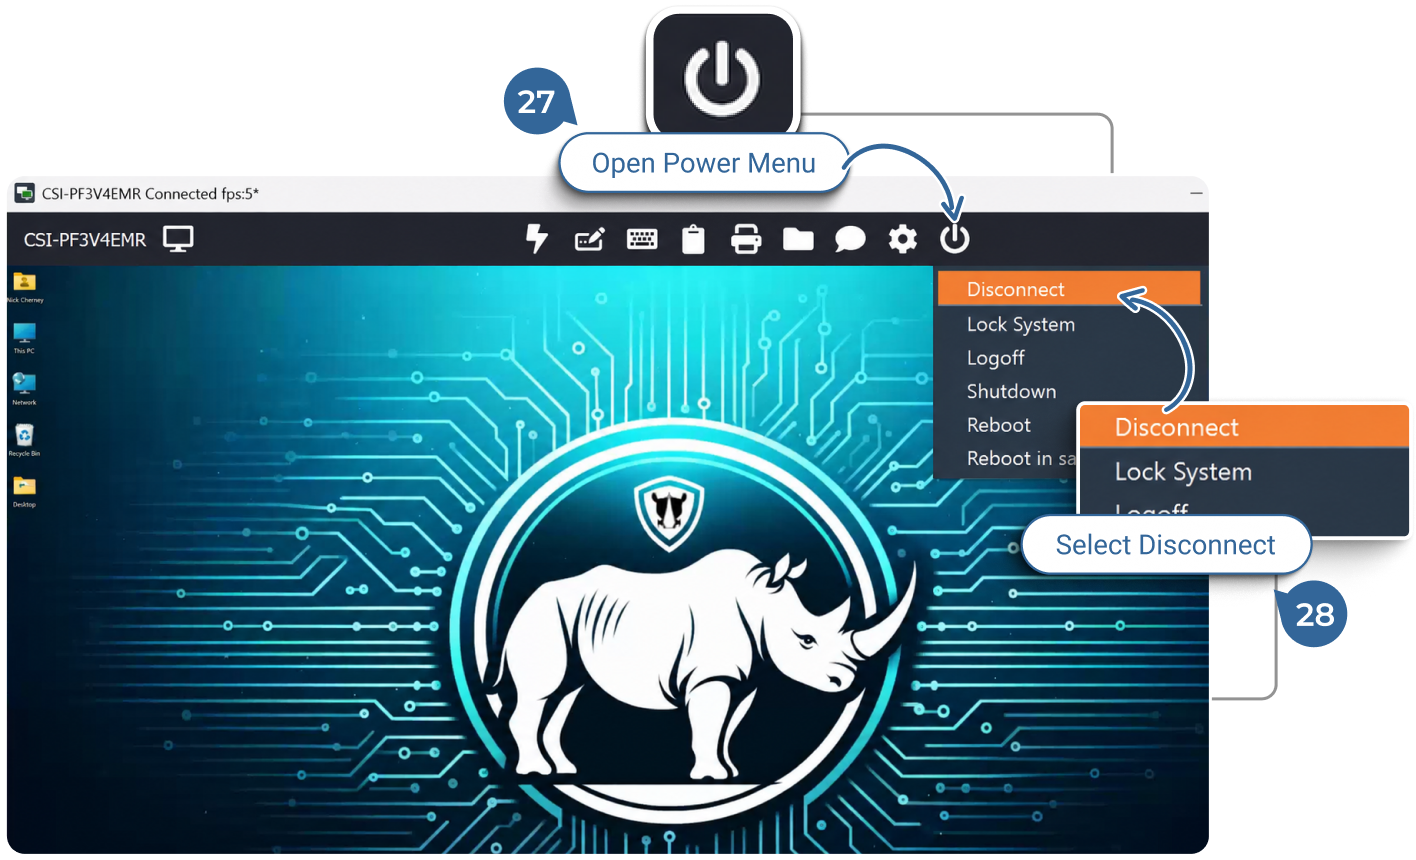
Remote System Options: Click on the power icon on the far right of the remote menu bar.
28.
Disconnect: Click “Disconnect” from the NinjaOne Remote menu dropdown.
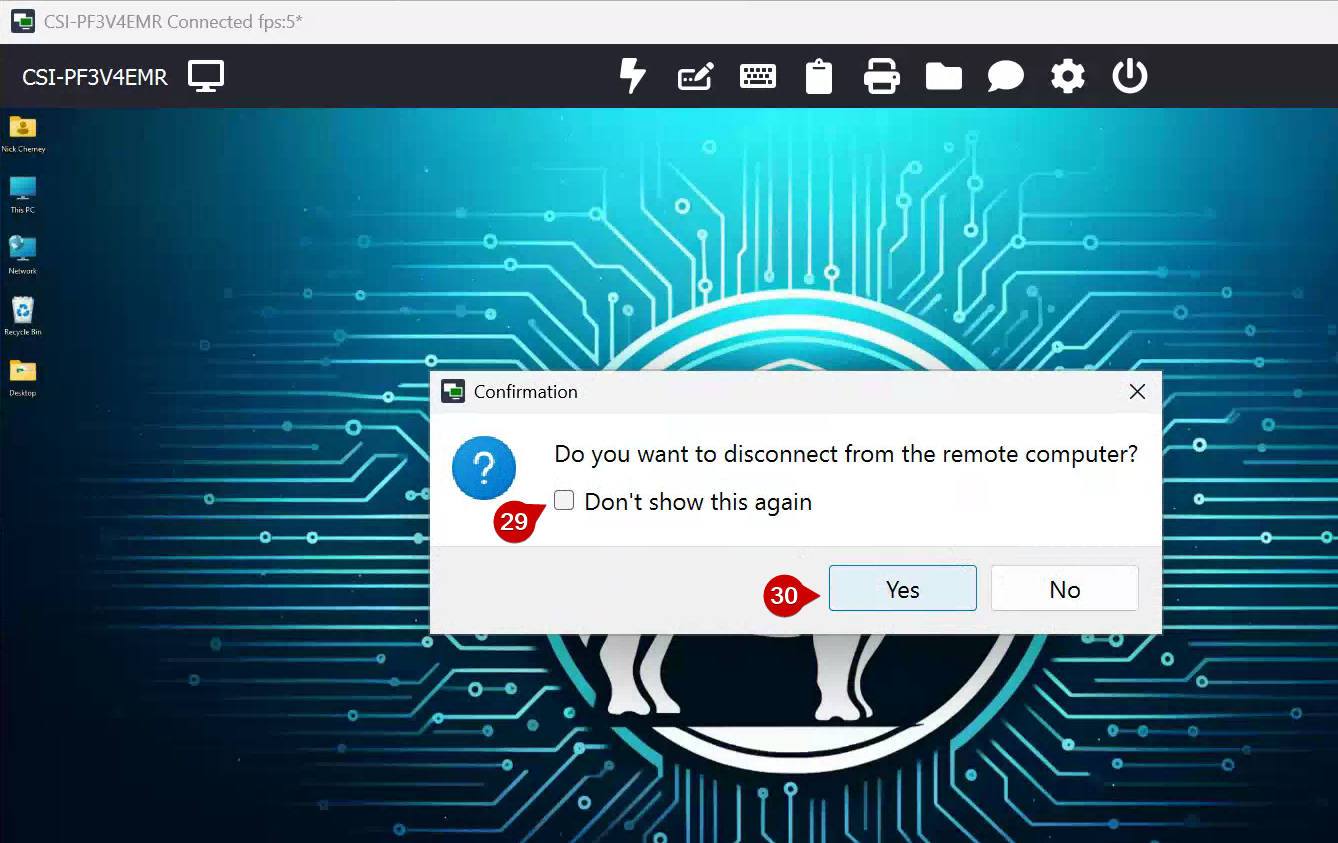
29.
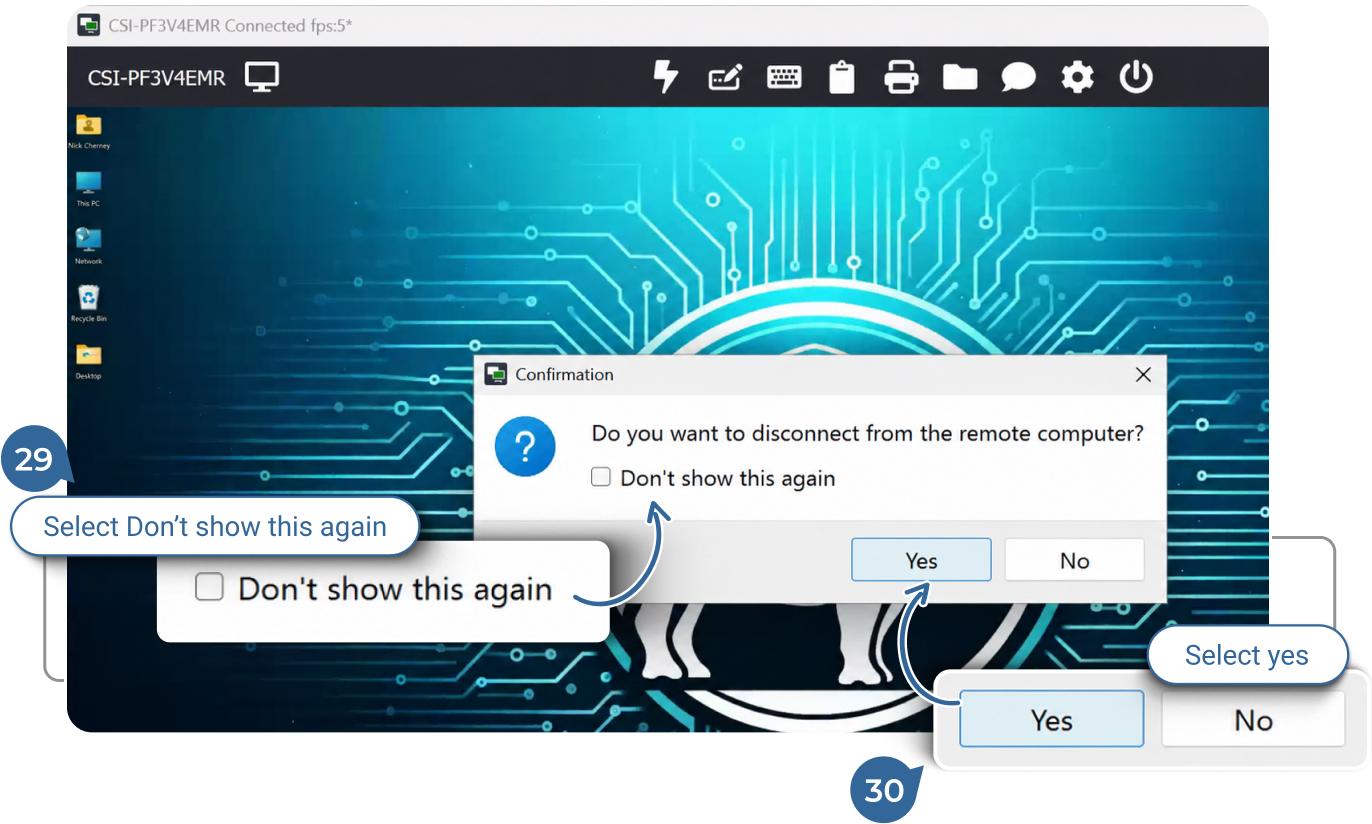
Dialogue persistence: Leave “Don’t show this again” unchecked to safeguard from closing your remote session in error.
30.
Confirm Disconnect: Click on “Yes” to disconnect from your remote session.
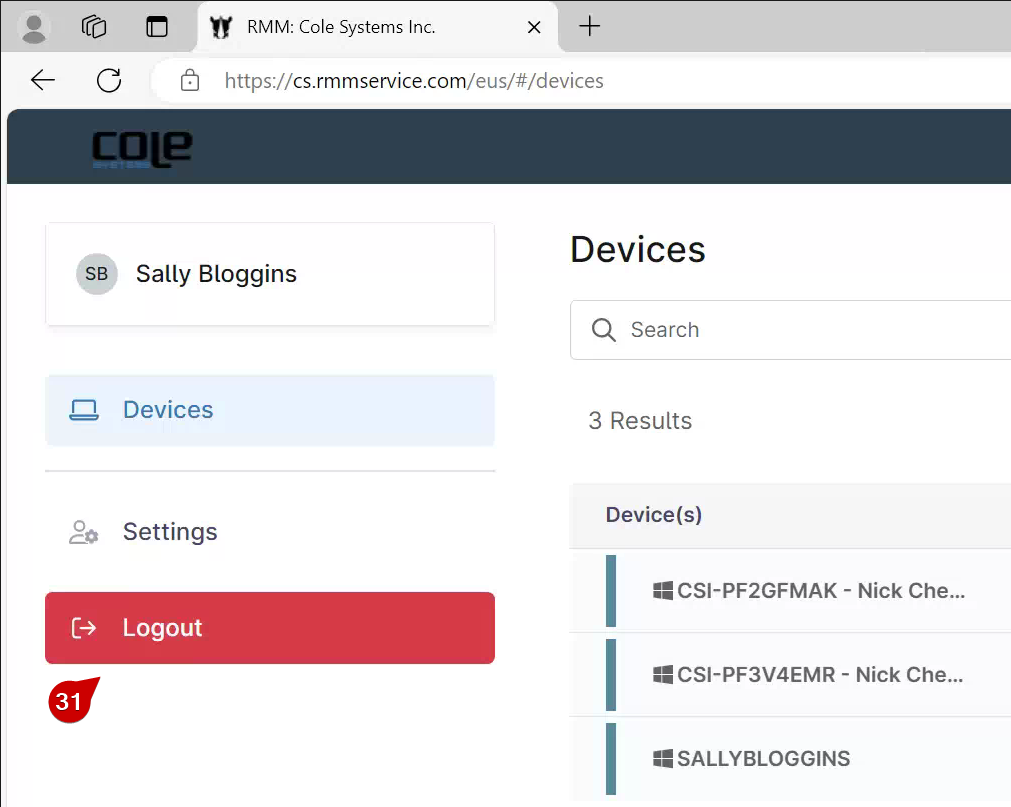
31.
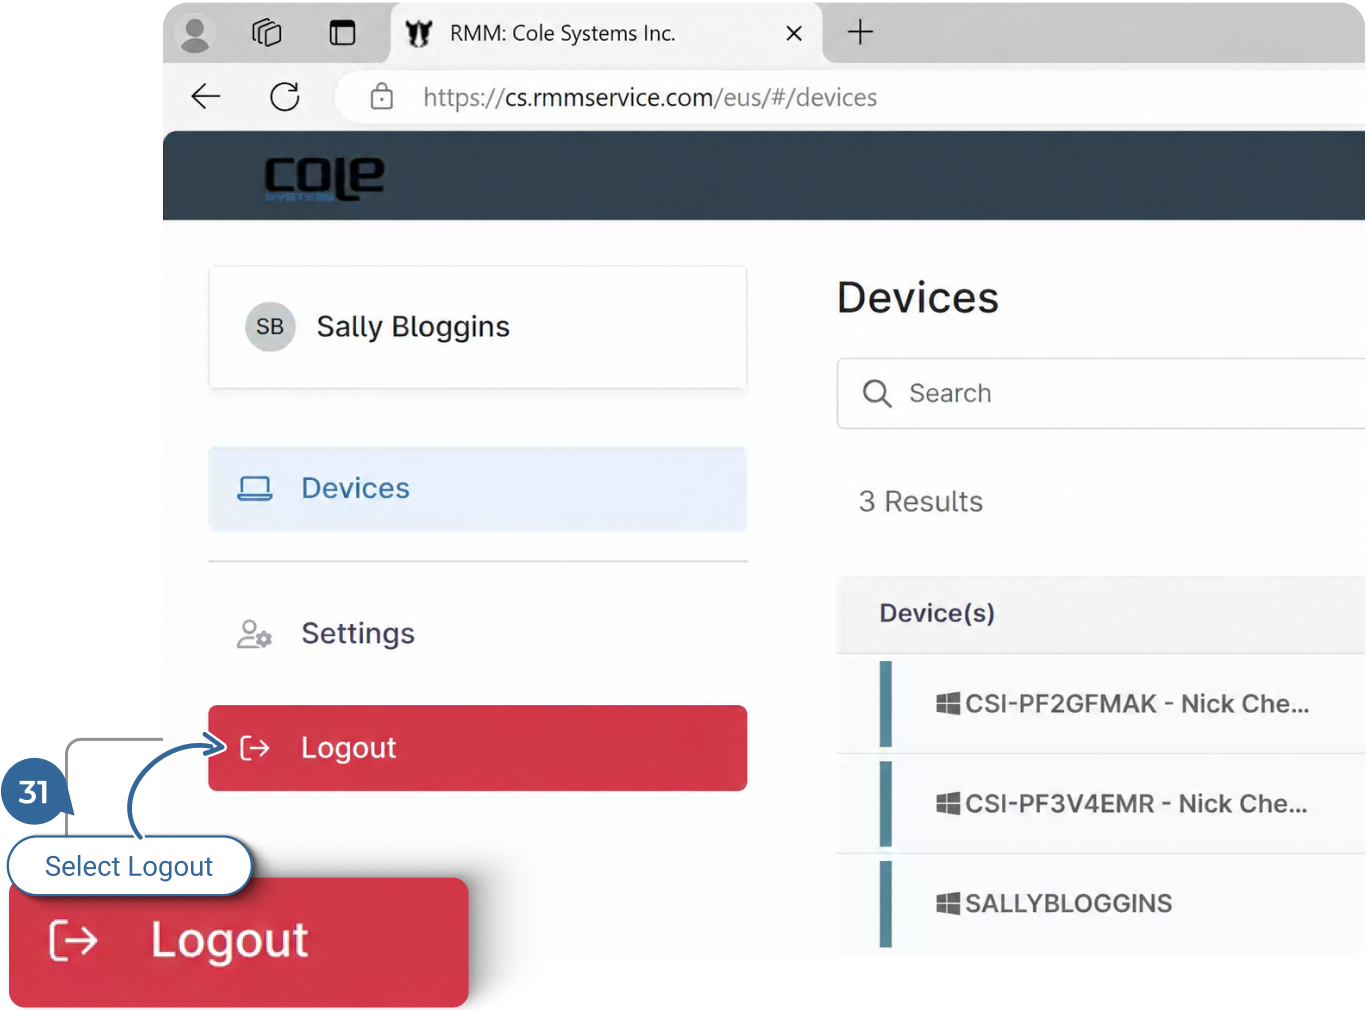
Log Out (Optional): Log out of NinjaOne if you are using a shared or public computer.
How to Remote Access Another Device

Next Step

2 / 2

1.

Accept Invitation and Create Account

This guide provides step-by-step instructions for accepting an End User invitation to NinjaOne, setting up Multi-Factor Authentication (MFA) using SMS, and accessing a device using NinjaOne Remote.

If you’ve already set up your account, skip directly to Page 3 “Login to NinjaOne”.

  1. Check Your Email: Look for an invitation email from Cole Systems “noreply@rmmservice.com”.
  2. Open the Invitation: Click the link labeled “Accept Invitation” to open the password entry form in your browser.
  3. Initiate Your Account: Set up your account by creating a strong password.
  4. Confirm Your Password: Re-enter the same password for confirmation.
  5. Submit the Password: Click on Submit to send your newly selected password to NinjaOne.

2 / 2

Next Step

2.

Set Up Multi-Factor Authentication (MFA)

You will be directed to the Multi Factor Authentication (MFA) Setup page to select a method of authentication.

If you’ve already set up your account, skip directly to Page 3 “Login to NinjaOne”.

  1. MFA Selection: Click on the MFA method dropdown.
  2. Select SMS Authentication: Choose SMS as your preferred authentication method.
  3. Enter Your Phone Number: Input your mobile phone number in the “Cell Phone” field.
  4. Send Code: Click “Send Code” to send the 6 digit code to your cell phone.
  5. Verify the Code: Check your phone for an SMS code and enter it into the verification field.
  6. Sign In: Confirm the code and click on “Sign In”.

2 / 2

Next Step

3.

Login to NinjaOne

Log In to NinjaOne with your credentials and MFA Code.
  1. Site Address: Enter the NinjaOne site address in your browser.
    https://cs.rmmservice.com/
  2. Username: Enter your email address for your username.
  3. Password: Enter your password.
  4. Keep me signed in: To reduce the amount of times you are asked to sign in and verify, check “Keep me signed in”.
  5. Sign In: Click on “Sign In”.

2 / 2

Next Step

4.

Install NinjaOne Remote

Install the NinjaOne Remote Application.

If you have already installed the NinjaOne Remote application skip steps 17 – 21 and go to Page 5 “Connect to Remote Computer”.

  1. Download the NinjaOne Remote App: If this is your first time accessing a device, download and install the Ninja Remote client from the appropriate link below.

    NinjaOne Remote for Windows
    NinjaOne Remote for Mac
  2. Install the Application: Click on the downloaded file to start the install process.
  3. Accept the agreement: Check “I have read and accepted the EULA (Required)”.
  4. Install: Click on the Install button in the bottom right-hand corner of the install window.
  5. Close Installation: Close the installation window by selecting “Done”.

2 / 2

Next Step

5.

Connect to Remote Computer

Locate the remote computer and initiate your remote session.
  1. Find the Device: Locate the device you need to access from the NinjaOne dashboard.
  2. Initiate Remote Access: Click on the NinjaOne Remote icon to open the connection.
  3. Start the Remote Session: A new window will open indicating that the Remote session is loading.
  4. Remote Session Window: Your remote session window will open and display the desktop of the remote device.
  5. Full Screen: Make your remote window full screen by clicking on the X made of arrows located in the upper right-hand corner.

2 / 2

Next Step

6.

End the Remote Session

End your remote session and logout of NinjaOne.
  1. Remote System Options: Click on the power icon on the far right of the remote menu bar.
  2. Disconnect: Click “Disconnect” from the NinjaOne Remote menu dropdown.
  3. Dialogue persistence: Leave “Don’t show this again” unchecked to safeguard from closing your remote session in error.
  4. Confirm Disconnect: Click on “Yes” to disconnect from your remote session.
  5. Log Out (Optional): Log out of NinjaOne if you are using a shared or public computer.

2 / 2

Next Step

Next Step

2 / 2

Get Started

Ready to Make Your IT Easier to Manage?

Talk to Cole Systems about your current technology challenges, security concerns, backup needs, or infrastructure goals. We’ll help you understand what needs attention and recommend practical next steps for your business.