Cole Systems Inc.

How to Send a

Changing the From Address

These instructions apply to organizations where users share a single fax mailbox among multiple users. Typically, the allowed email sending address attached to your account will be fax@my-company-email.com (where @my-company-email.com is your company email domain).
If you have your own personal fax number and account, skip steps 2-7 and send from your own email address instead.
1.
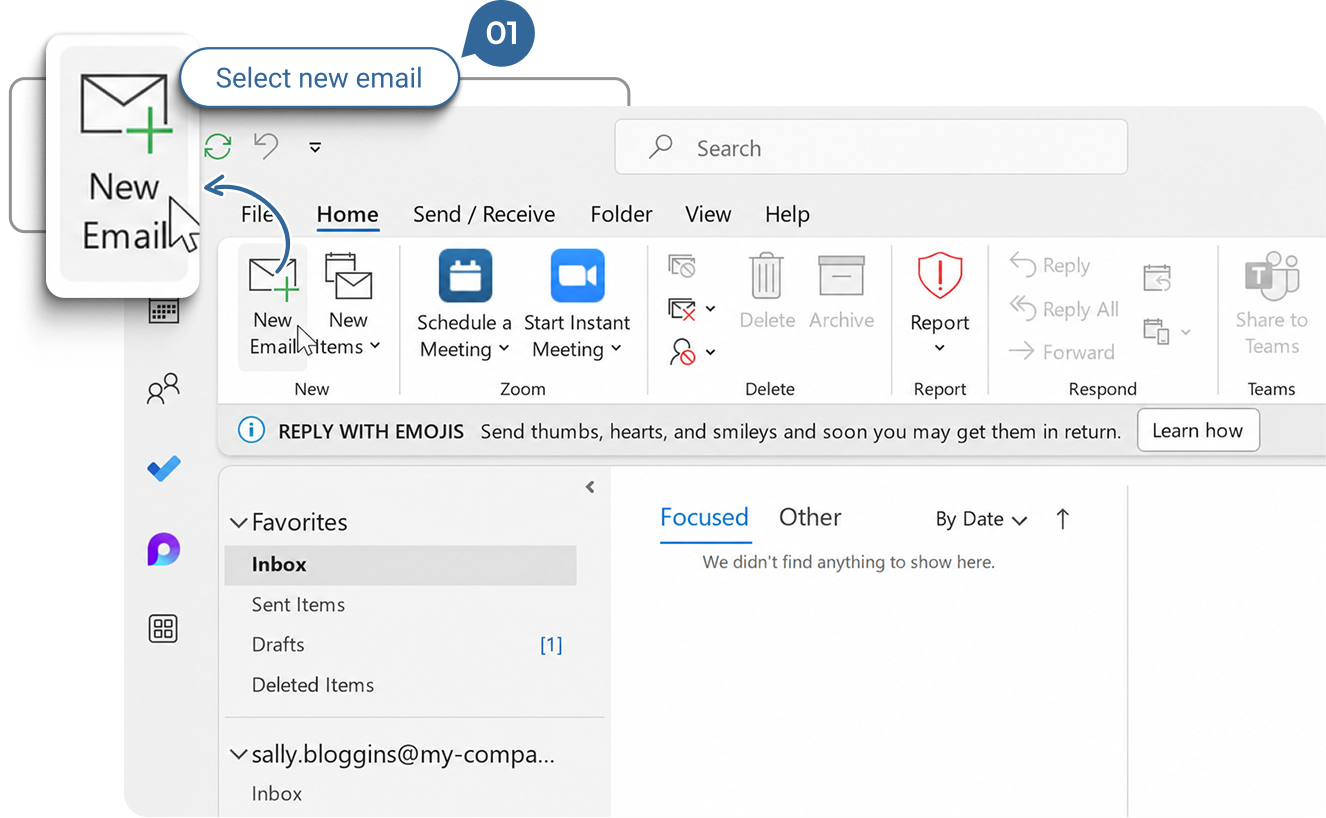
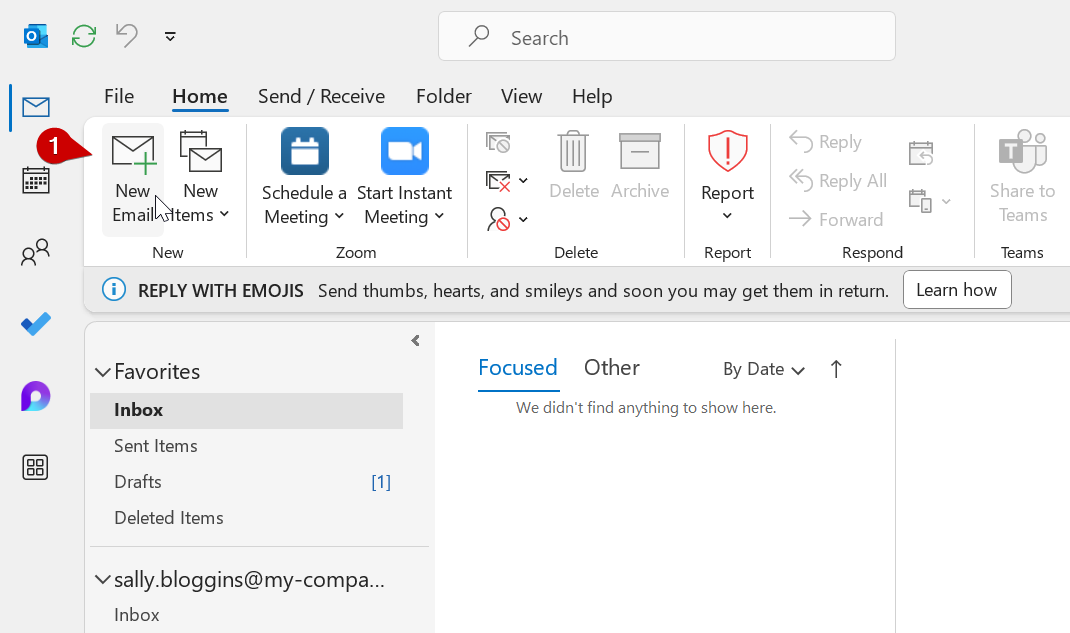
Compose New Email: Start by creating a new email message in Outlook.
2.
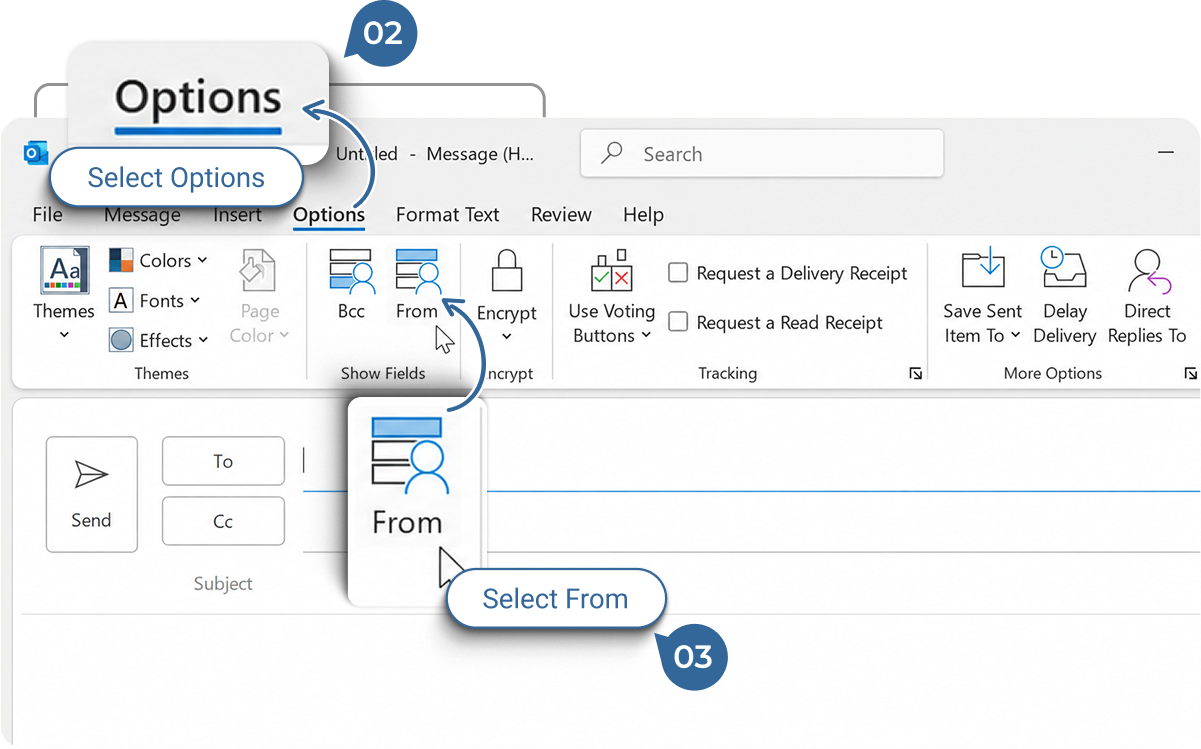
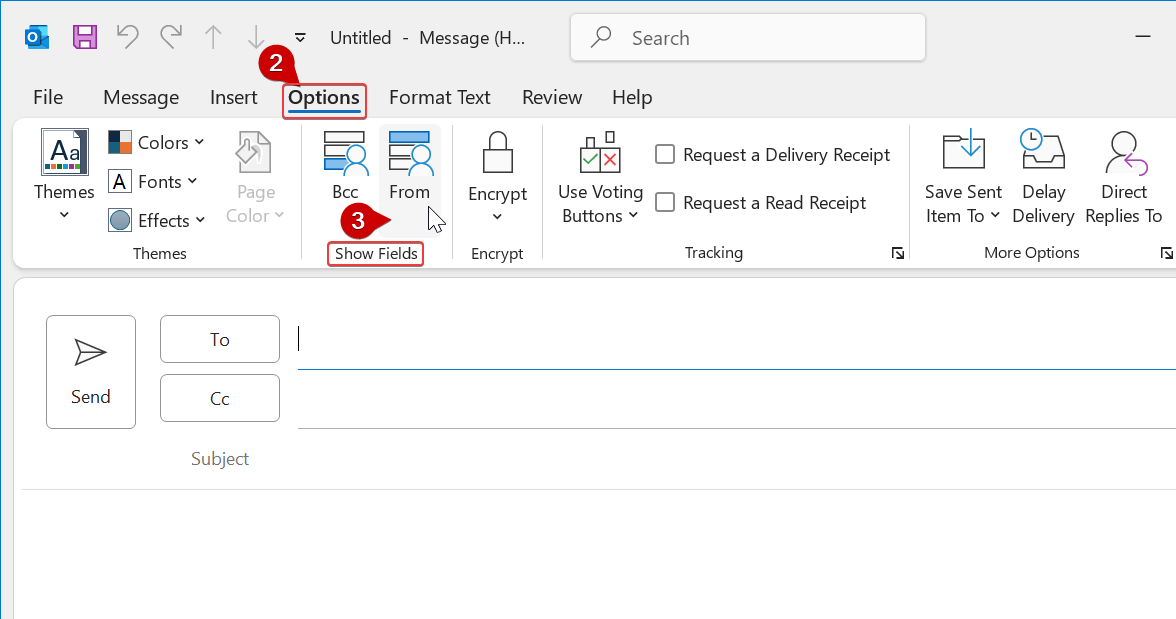
Options Tab: If this is your first time sending a fax from this computer, click the “Options” tab in the top menu.
3.
Show Fields: Click the “From” button under the “Show Fields” section to enable the “From” field in your email.
4.
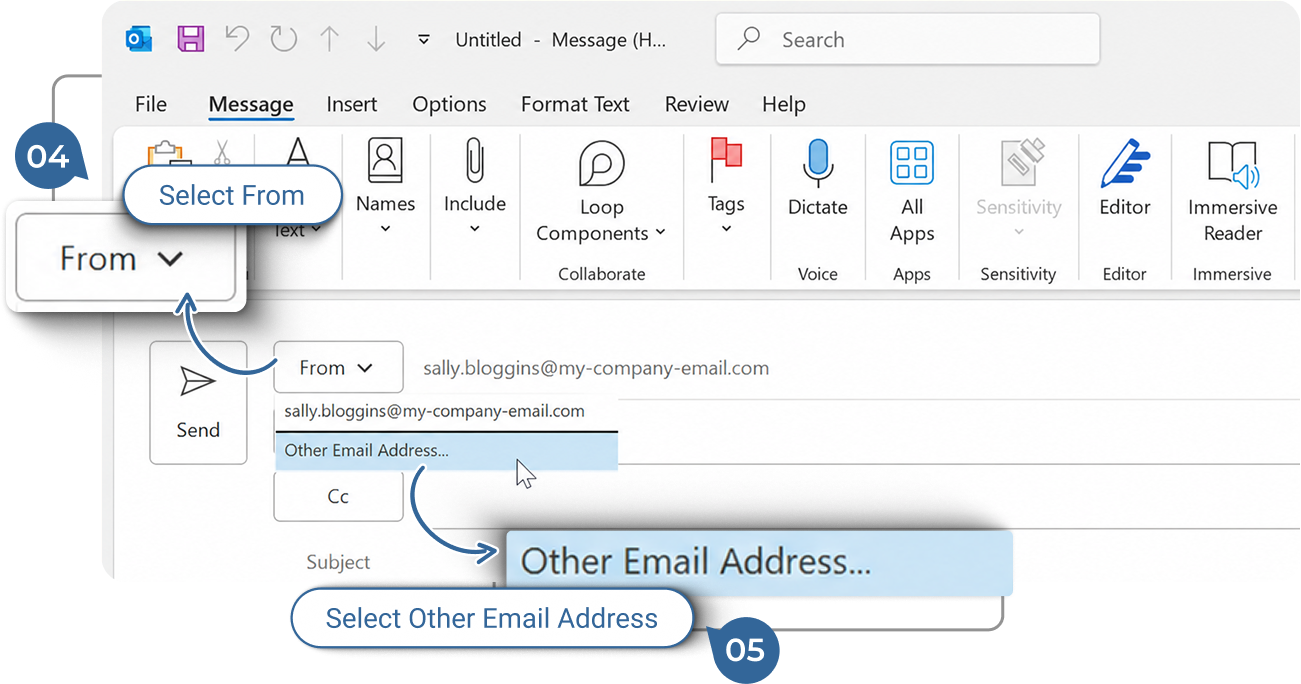
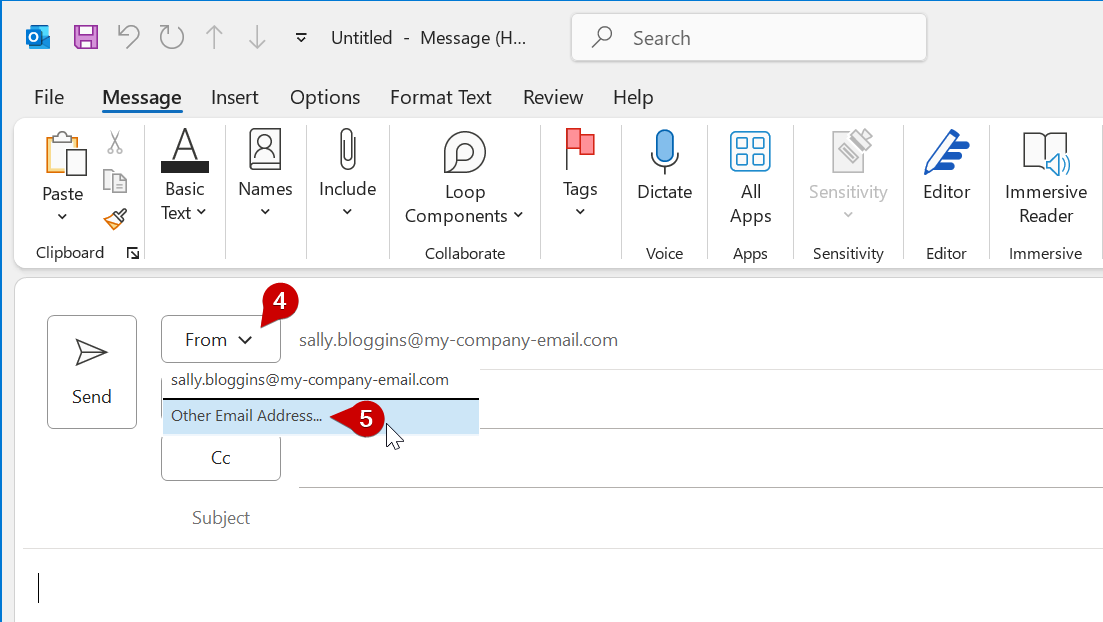
From Drop-Down: The From drop-down menu will now be available next to the “Send” button. Click it.
5.
Select Other Address: Choose “Other Email Address…” from the “From” drop-down menu.
6.
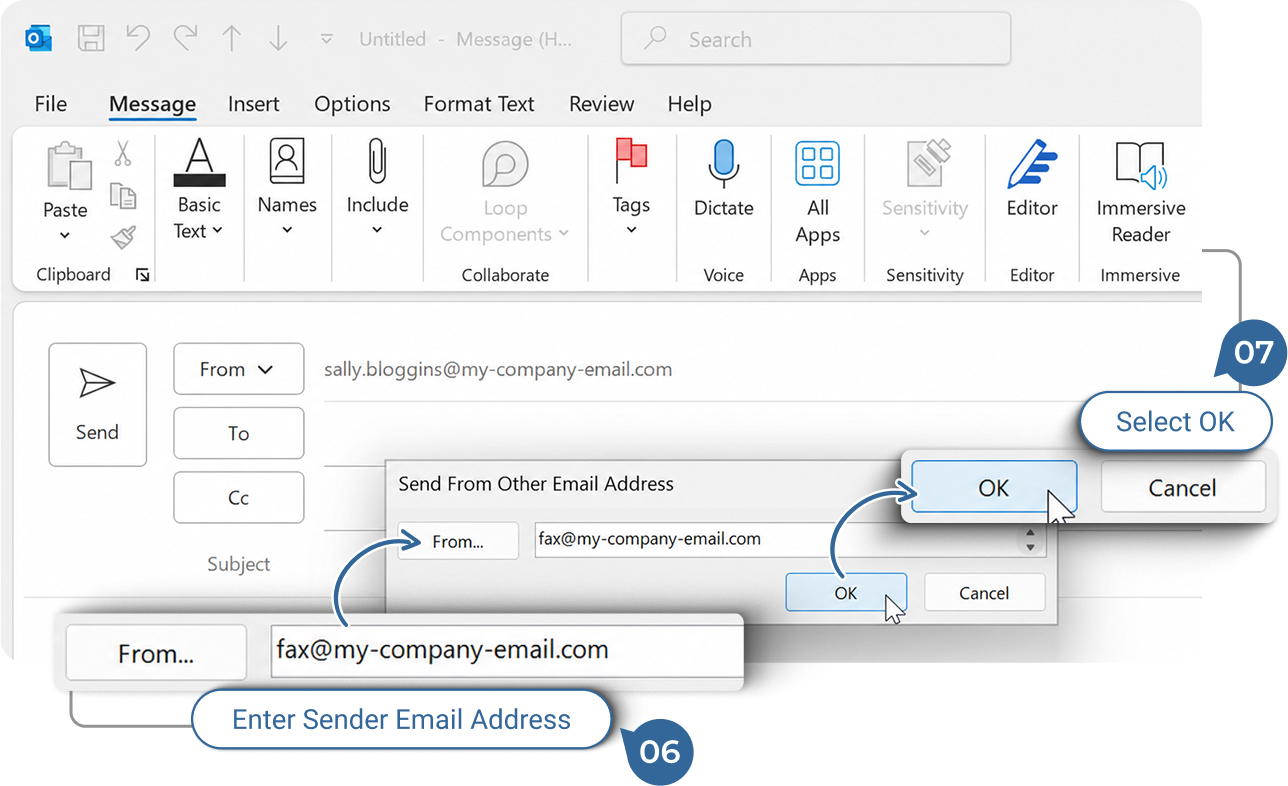
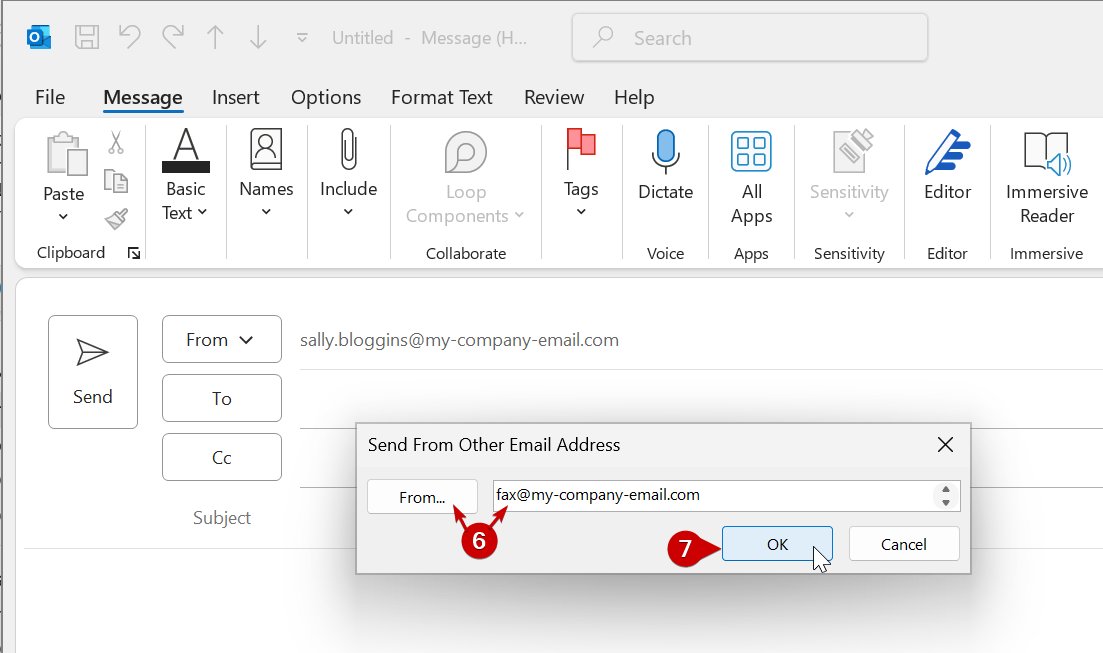
Specify Fax Account: In the “Send From Other Email Address” dialog box, type “fax” in the text box or use the “From…” button to locate your outgoing fax account.
7.
Confirm: Click “OK” to save your selection and proceed with sending the fax.

Composing and Sending the Email

8.
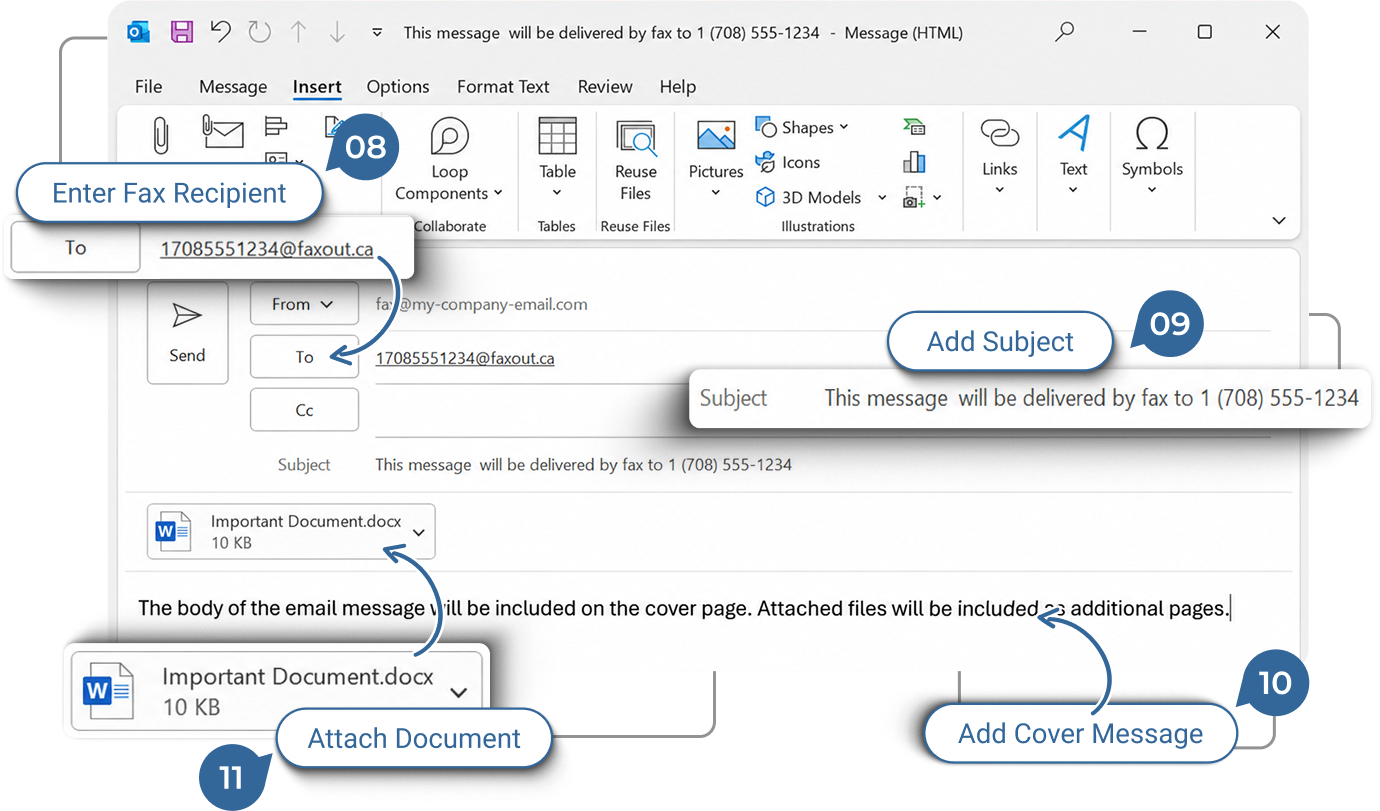
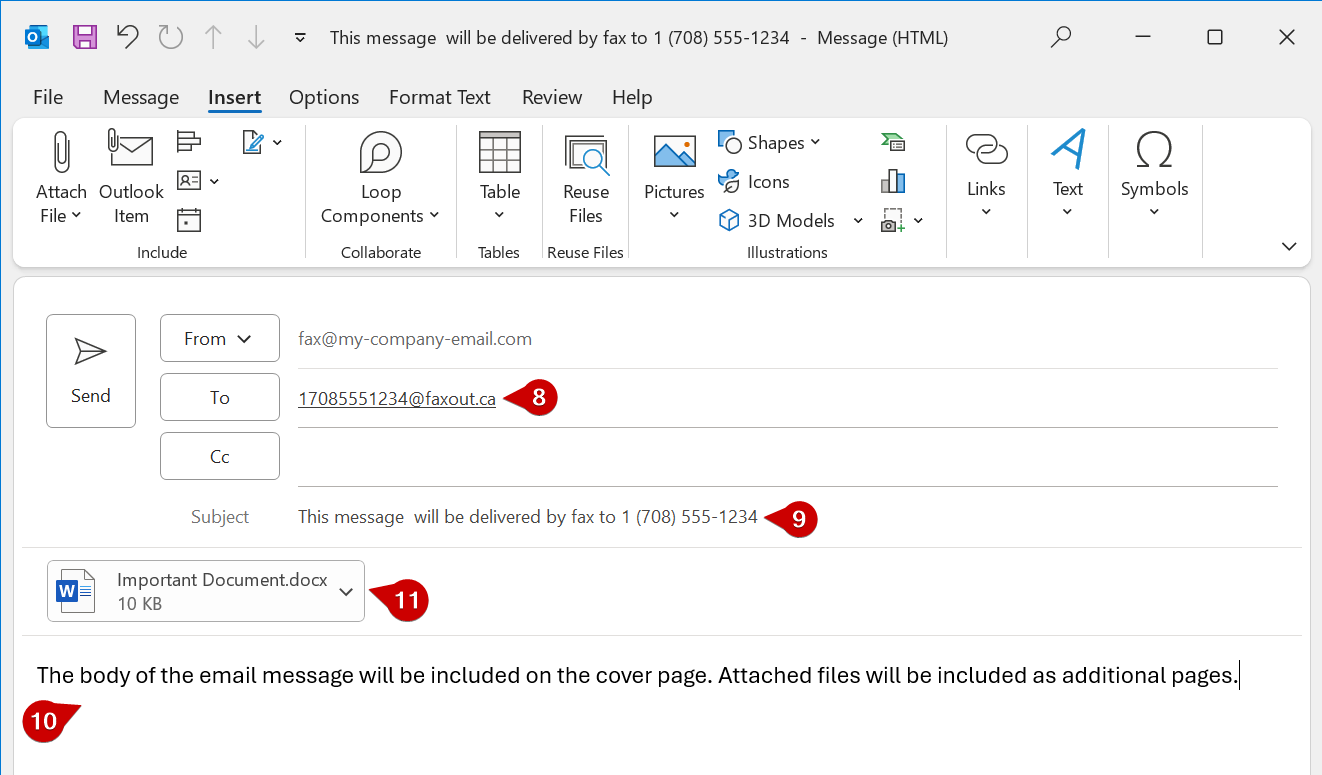
Email Recipient: Enter the recipient’s fax number, including the country code, followed by “@faxout.ca”. Example: 17085551234@faxout.ca
9.
Email Subject: The subject of your email will appear in the “Re:” field on the fax cover page.
10.
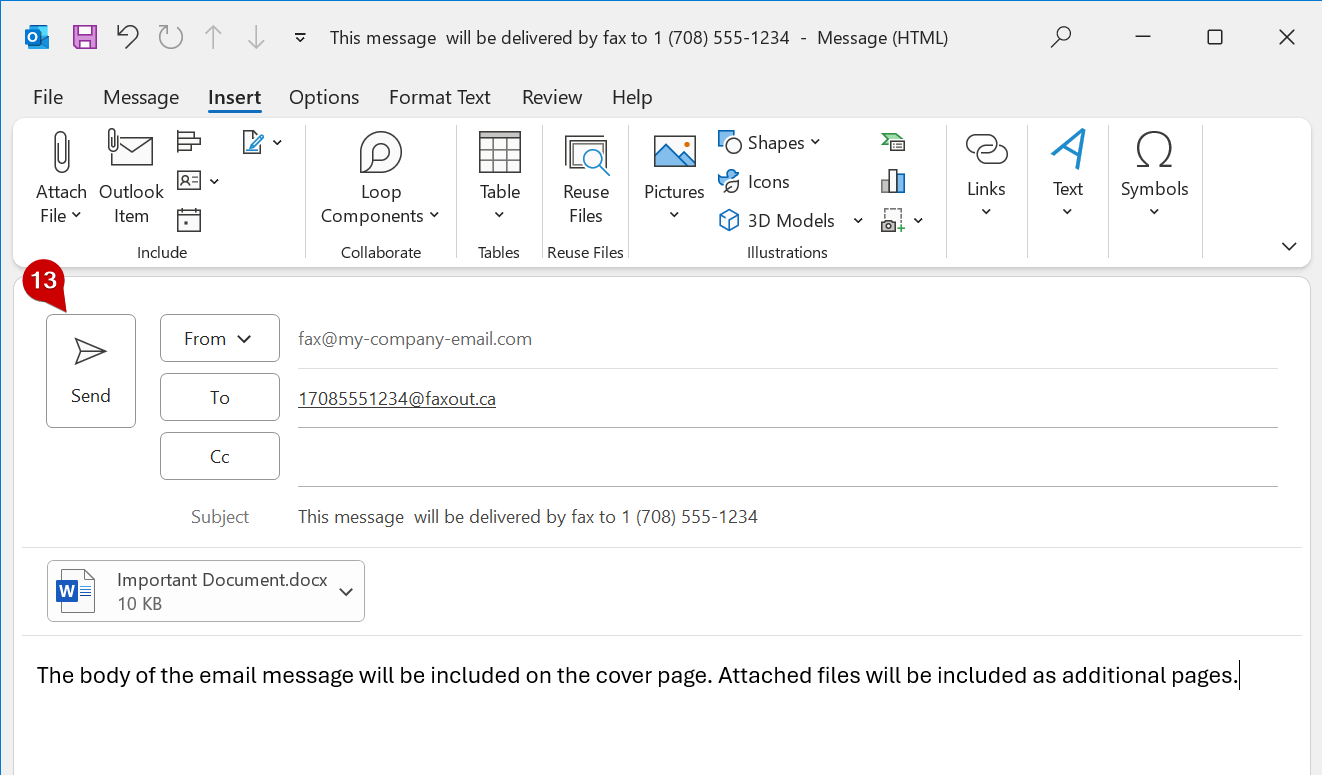
Email Body: The body of your email will be added to the “Comments” section on the fax cover page.
11.
Attachments: Any documents attached to your email will be converted to images and included as additional pages in the fax.
12.
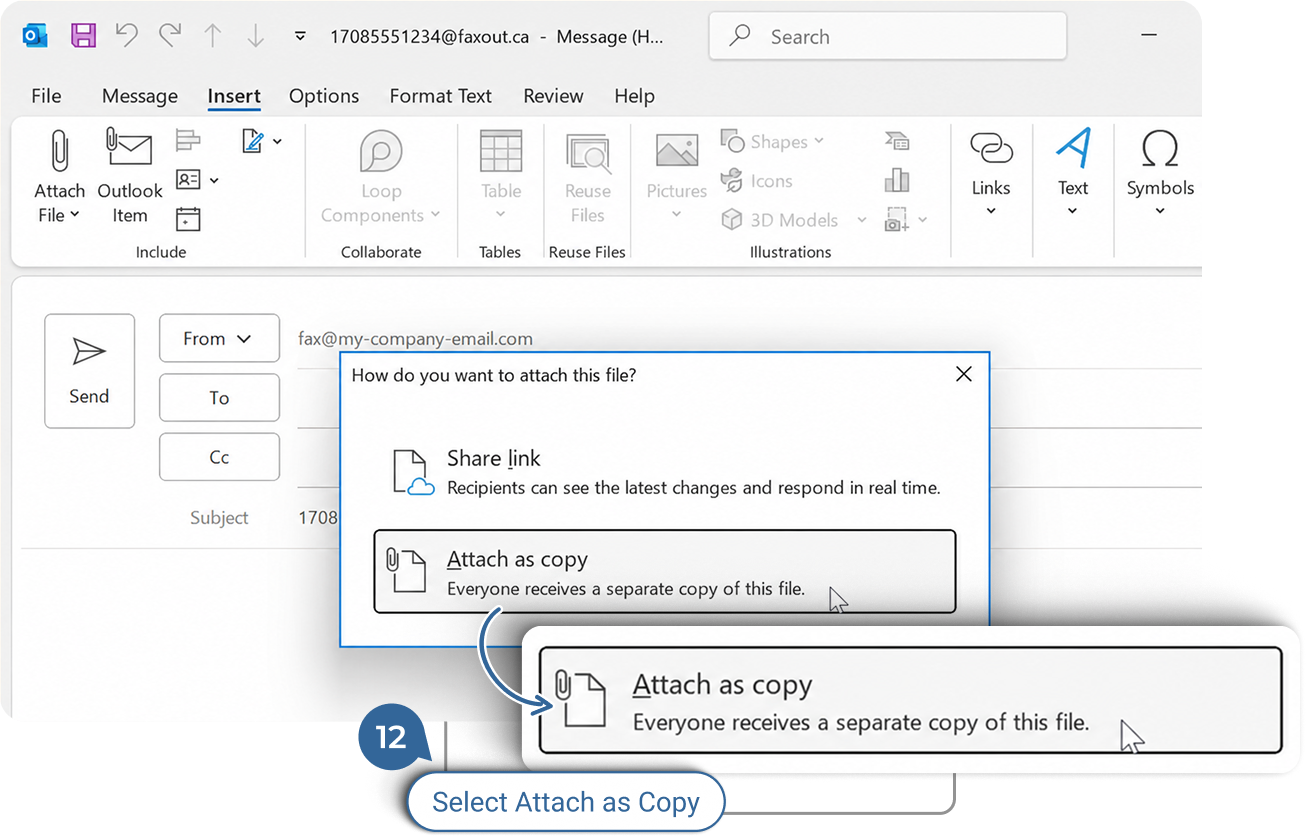
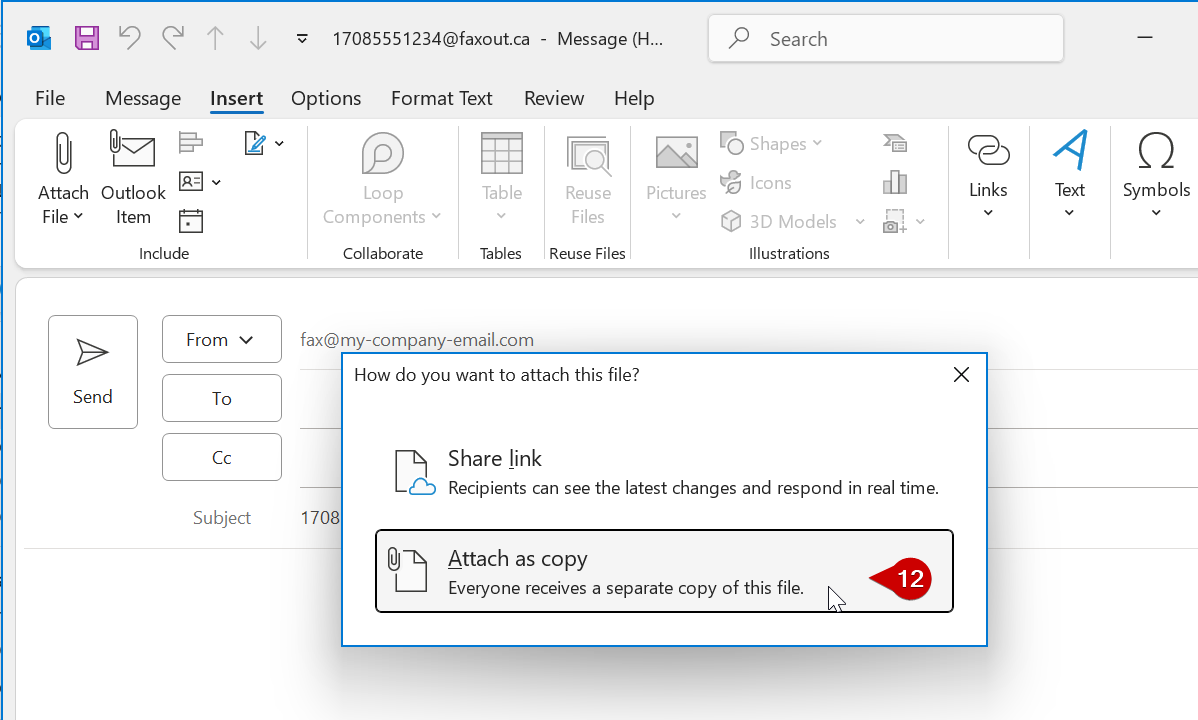
Attach as copy: Make sure to select “Attach as copy” to send the file rather than a link to it.
13.
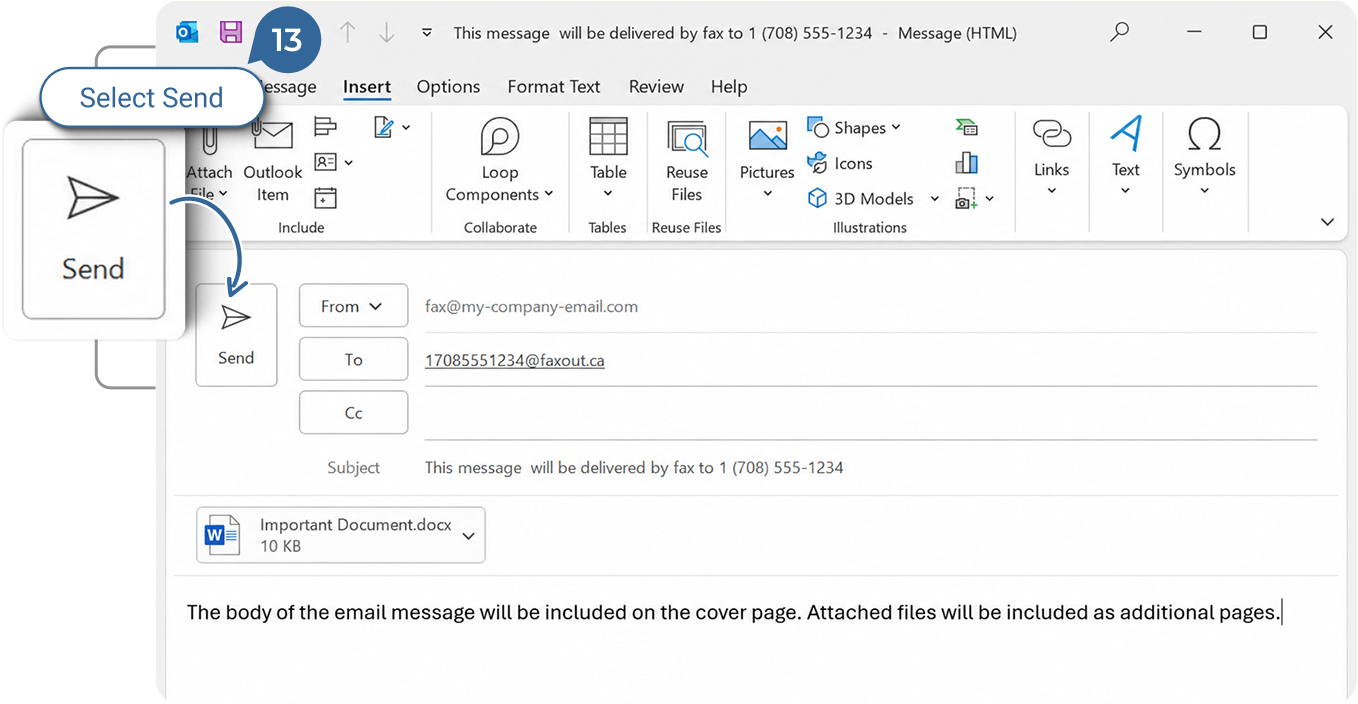
Send Fax : Once everything is ready, click the “Send” button to submit your fax for processing.
14.
Processing Time and Status: The fax may take 10 minutes or more to be processed, depending on the number of pages.

If you have your own personal fax number and account, skip steps 2-7 and send from your own email address instead.

15.
Check Status: To check the status or manage your faxes, log in to https://fax.cole.systems .

How to Send a Fax by Email

Next Step

2 / 2

1.

Changing the From Address

These instructions apply to organizations where users share a single fax mailbox among multiple users. Typically, the allowed email sending address attached to your account will be fax@my-company-email.com (where @my-company-email.com is your company email domain).

If you have your own personal fax number and account, skip steps 2-7 and send from your own email address instead.

  1. Compose New Email: Start by creating a new email message in Outlook.
  2. Options Tab: If this is your first time sending a fax from this computer, click the “Options” tab in the top menu.
  3. Show Fields: Click the “From” button under the “Show Fields” section to enable the “From” field in your email.
  4. From Drop-Down: The From drop-down menu will now be available next to the “Send” button. Click it.
  5. Select Other Address: Choose “Other Email Address…” from the “From” drop-down menu.
  6. Specify Fax Account: In the “Send From Other Email Address” dialog box, type “fax” in the text box or use the “From…” button to locate your outgoing fax account.
  7. Confirm: Click “OK” to save your selection and proceed with sending the fax.

2 / 2

Next Step

2.

Composing and Sending the Email

  1. Email Recipient: Enter the recipient’s fax number, including the country code, followed by “@faxout.ca”.
    Example: 17085551234@faxout.ca
  2. Email Subject: The subject of your email will appear in the “Re:” field on the fax cover page.
  3. Email Body: The body of your email will be added to the “Comments” section on the fax cover page.
  4. Attachments: Any documents attached to your email will be converted to images and included as additional pages in the fax.
  5. Attach as copy: Make sure to select “Attach as copy” to send the file rather than a link to it.
  6. Send Fax: Once everything is ready, click the “Send” button to submit your fax for processing.
  7. Processing Time and Status: The fax may take 10 minutes or more to be processed, depending on the number of pages.

    You will receive a message in your fax mailbox with the final status—whether successful or if there was a communication failure.
  8. Check Status: To check the status or manage your faxes, log in to https://fax.cole.systems .

2 / 2

Next Step

Next Step

2 / 2

Get Started

Ready to Make Your IT Easier to Manage?

Talk to Cole Systems about your current technology challenges, security concerns, backup needs, or infrastructure goals. We’ll help you understand what needs attention and recommend practical next steps for your business.